A step by step guide on how to integrate Google Customer Reviews into your Shopify shop.
Google Merchant Center Classic
Step 1) Enabling The Program
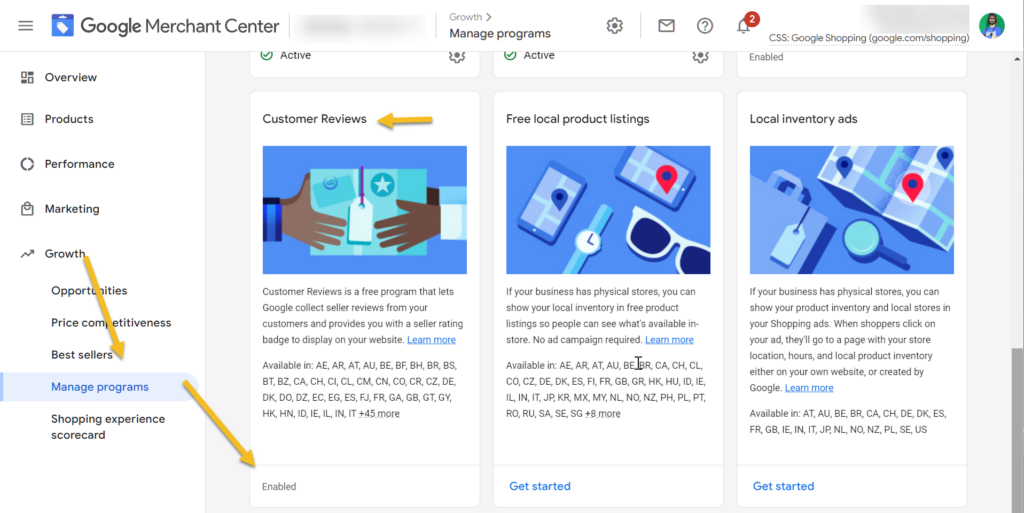
Log in to Google Merchant Center (you must have admin access) and go to Growth > Manage Programs
Click on enable, if not already done in the Customer Reviews program.
Read and agree to the terms and conditions.
Step 2) Getting The Code
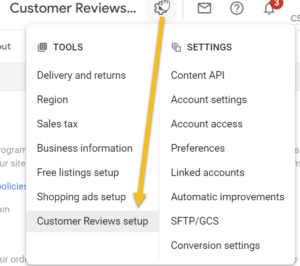
You should now be redirected to the setup option, however, if you have already done the above, to get to the code click on the gear icon from the top right side and click on Customer review setup. Now click on the setup tab.
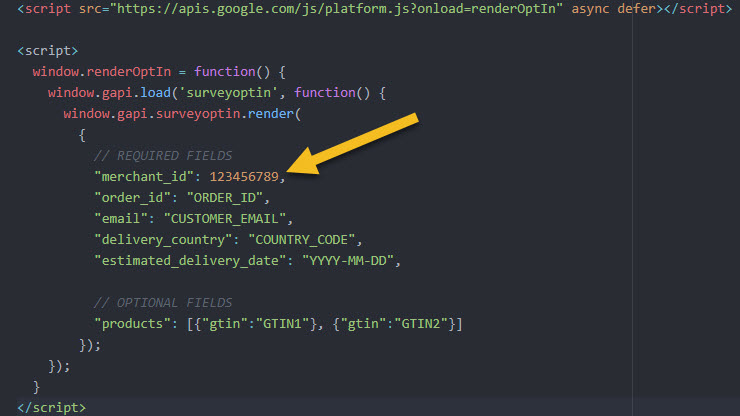
Scroll down till you see the opt-in code. Now copy your merchant id value. Save this in text file, we will be using this later.
Step 3) Installing The Code In Shopify
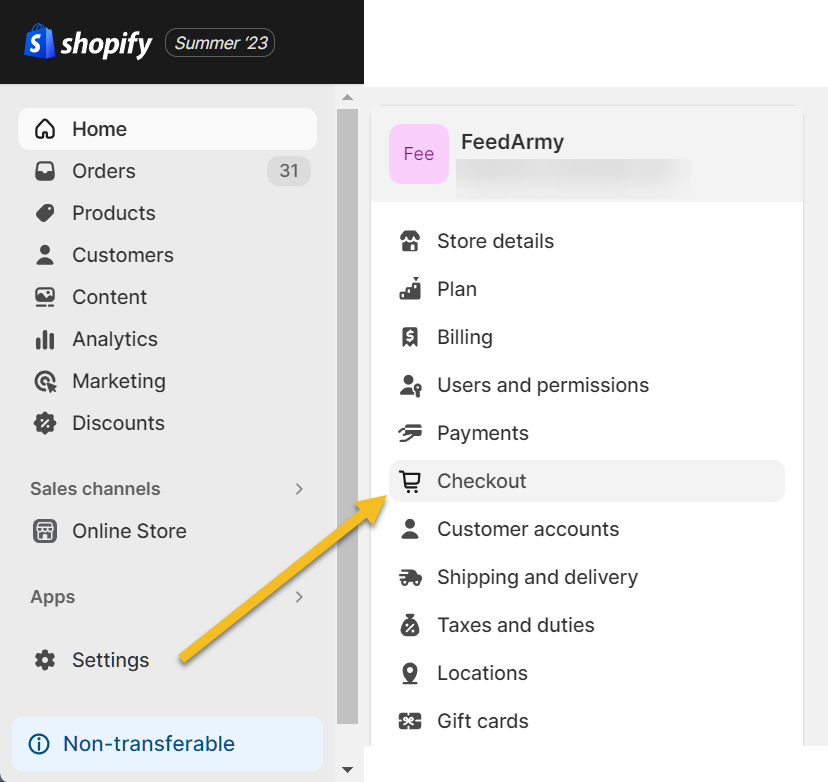
Log in to your Shopify account and navigate to Settings > Checkout
Scroll down till you see Order Status Page > Additional scripts.
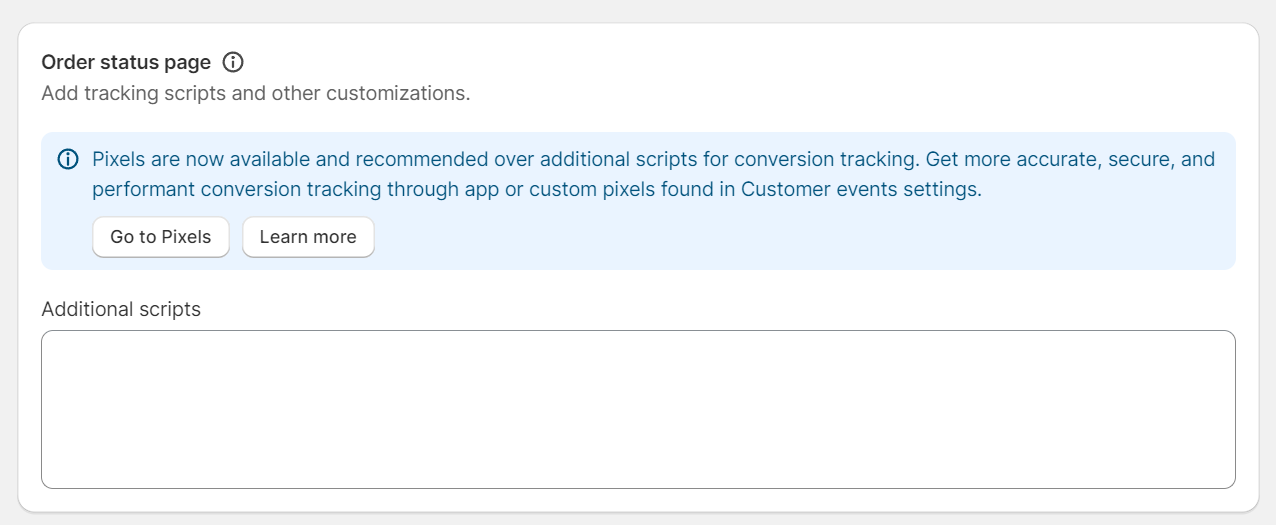
Now paste the below code and make the following two changes
Important!
Many merchants have issues where the code is not triggered when you have first_time_accessed included. Jason Roberts shared this in the comments below. Therefore, I have removed that part of the code to ensure it works.
- Change the value for fa_merchant_id to your merchant id you saved in the text file.
- Change the value for fa_delivery_days to your estimated delivery time in days.
<!-- Copyright FeedArmy 2024 Version 1.05 -->
<!-- CODE SETTINGS START -->
<!-- CODE SETTINGS START -->

<!-- Please set estimated delivery days -->
{% assign fa_merchant_id = 123456789 %}

<!-- Please set estimated delivery days -->
{% assign fa_delivery_days = 3 %}

<!-- CODE SETTINGS END -->
<!-- CODE SETTINGS END -->
{%- case shipping_address.country_code -%}
{%- when 'BG' -%}{%- assign fa_language = 'bg' -%}{%- when 'CZ' -%}{%- assign fa_language = 'cs' -%}{%- when 'DK' -%}{%- assign fa_language = 'da' -%}{%- when 'DE' -%}{%- assign fa_language = 'de' -%}{%- when 'GR' -%}{%- assign fa_language = 'el' -%}{%- when 'AU' -%}{%- assign fa_language = 'en-AU' -%}{%- when 'GB' -%}{%- assign fa_language = 'en-GB' -%}{%- when 'US' -%}{%- assign fa_language = 'en-US' -%}{%- when 'CA' -%}{%- assign fa_language = 'en-CA' -%}{%- when 'ES' -%}{%- assign fa_language = 'es' -%}{%- when 'FI' -%}{%- assign fa_language = 'fi' -%}{%- when 'FR' -%}{%- assign fa_language = 'fr' -%}{%- when 'HR' -%}{%- assign fa_language = 'hr' -%}{%- when 'HU' -%}{%- assign fa_language = 'hu' -%}{%- when 'ID' -%}{%- assign fa_language = 'id' -%}{%- when 'IT' -%}{%- assign fa_language = 'it' -%}{%- when 'JP' -%}{%- assign fa_language = 'JA' -%}{%- when 'KR' -%}{%- assign fa_language = 'ko' -%}{%- when 'LT' -%}{%- assign fa_language = 'lt' -%}{%- when 'LV' -%}{%- assign fa_language = 'lv' -%}{%- when 'MY' -%}{%- assign fa_language = 'ms' -%}{%- when 'BE' -%}{%- assign fa_language = 'nl' -%}{%- when 'NL' -%}{%- assign fa_language = 'nl' -%}{%- when 'NO' -%}{%- assign fa_language = 'no' -%}{%- when 'PL' -%}{%- assign fa_language = 'pl' -%}{%- when 'BR' -%}{%- assign fa_language = 'pt-BR' -%}{%- when 'PT' -%}{%- assign fa_language = 'pt-PT' -%}{%- when 'RO' -%}{%- assign fa_language = 'ro' -%}{%- when 'RU' -%}{%- assign fa_language = 'ru' -%}{%- when 'SK' -%}{%- assign fa_language = 'SK' -%}{%- when 'SI' -%}{%- assign fa_language = 'sl' -%}{%- when 'RS' -%}{%- assign fa_language = 'sr' -%}{%- when 'SE' -%}{%- assign fa_language = 'sv' -%}{%- when 'TH' -%}{%- assign fa_language = 'th' -%}{%- when 'TR' -%}{%- assign fa_language = 'tr' -%}{%- when 'VN' -%}{%- assign fa_language = 'vi' -%}{%- when 'CN' -%}{%- assign fa_language = 'zh-CN' -%}{%- when 'TW' -%}{%- assign fa_language = 'zh-TW' -%}
{%- else -%}
{%- assign fa_language = 'en' -%}
{%- endcase -%}

{% assign fa_delivery_seconds = 86400 | times: fa_delivery_days %}
<script src="https://apis.google.com/js/platform.js?onload=renderOptIn" async defer></script>
<script>
  window.renderOptIn = function() {
    window.gapi.load('surveyoptin', function() {
      window.gapi.surveyoptin.render(
        {
          "merchant_id": {{ fa_merchant_id }},
          "order_id": "{{ order.order_number }}",
          "email": "{{ order.email }}",
          "delivery_country": "{{ order.shipping_address.country_code }}",
          "estimated_delivery_date": "{{'now' | date: '%s' | plus : fa_delivery_seconds  | date: '%Y-%m-%d' | uri_encode | replace:'+','%20'}}",
          "products": [{%- for item in order.line_items -%}{%- if item.variant.barcode != blank -%}{"gtin":"{{ item.variant.barcode }}"}{%- unless forloop.last -%},{%- endunless -%}{%- endif -%}{%- endfor -%}]
        });
        window.___gcfg = {
          lang: '{{ fa_language }}'
        };
    });
  }
</script>
<!-- Copyright FeedArmy 2024 Version 1.05 -->
Click on Save
Step 4) Installing The Badge
Navigate to Online Store > Themes > 3dot menu > Edit Code
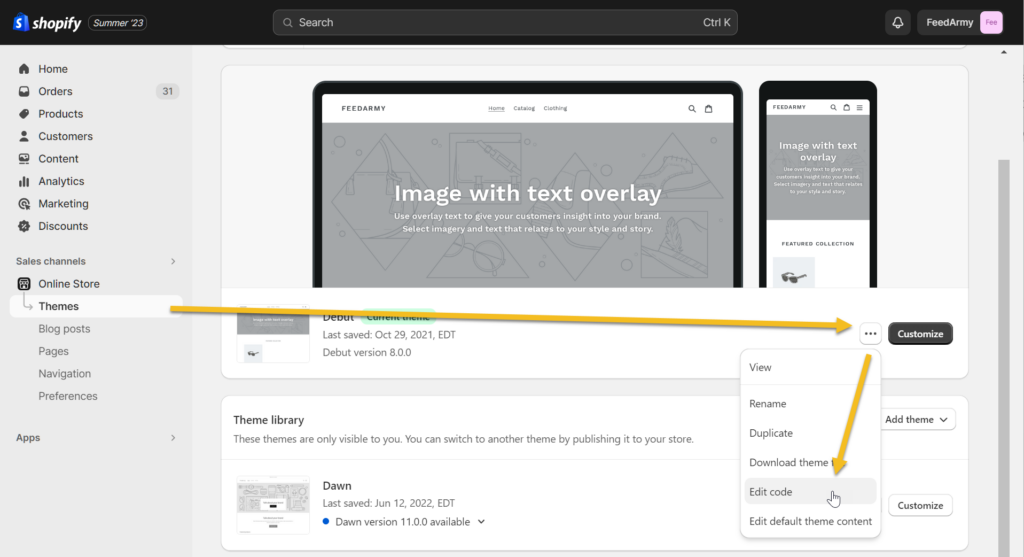
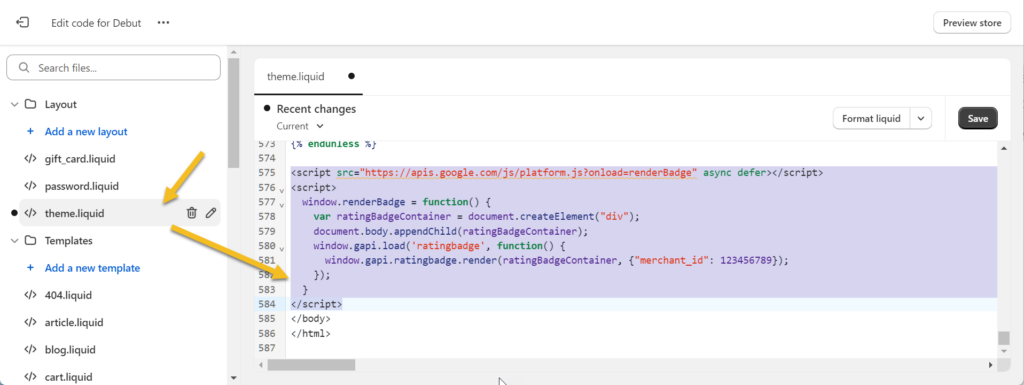
In the left hand side theme menu, choose theme.liquid from the layout section.
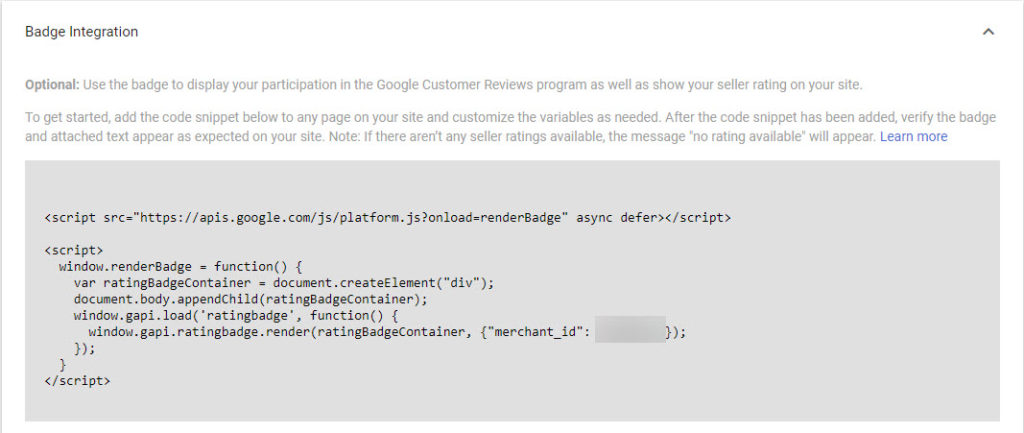
Go back to Google Merchant Center > gear icon > Customer review setup > settings. Scroll down and copy your Badge Integration code.
Paste the code before the closing tag of </body>
Need Help?
Do you have a question or need specialist support? Get in touch!
- 29-Dec-2023 : Added Canada = English


Hello,
Thank you for the great guide! I’m facing a problem. When i go to “Growth, Manage Programs” i don’t see “Customer Reviews”. I have Product Ratings, Remarketing, Promotions etc, but no Customer Reviews.
Any idea how to activate it? I have 3 merchant accounts for different stores and they all don’t have an option to enable Customer Reviews.
I can still see it, make sure you are an admin. Maybe that is causing you to not see all options?
No, i’m the only admin of all 3 merchant accounts. The only thing that is missing is Customer Reviews. All other options are there.
I have never encountered this issue. I recommend reaching out to Google Support.
Hello, I do Have a strange behavior, I do not get this google review script popup in my Dawn 13.0 theme after order placed , but after order placed and I check this order status in my admin section I can go to top order maintenance section menu and activate “see customer order page” and as soon as I see this order page I do get this pop up with customer email inside and option for me Yes or No , as a store owner I can do it but not as a customer after order placed 🙂 Any solution to fix this ? Thanks
Hello Mike, please note that the theme is irrelevant, considering the review popup appears on the thank you page, which is part of the checkout, not the theme.
As Shopify is moving away from additional scripts and moving towards pixels, I recommend you install an app that supports this feature. Do not use my code, as it will no longer work in 2025 when Shopify moves away from additional scripts.
Strange that Google app for Shopify do not support this important Google option :). Which app would you recommend ? Thanks.
Currently I don’t know of any that do it.
Following up on this, has anybody had any luck integrating the opt-in module into the sandboxed pixel environment?
It’s scheduled to be built.
Hey Emmanuel,
Thank you for your code and instructions to set-up Google Reviews in Shopify.
I am using Mr Parker Theme and I copied your code to the Checkout -> Order status page Additional scripts, per the tutorial.
This seems to work as I placed a test order and have the pop-up displayed on the order status page to sign on Google reviews.
Nonetheless I have a question for you. As I start my business, to reference my products I only have SKU and ASIN (Amazon Product number) which I use to upload reviews for my products in Google and it works.
Will this work with your code to describe products in the order:
“products”: [{%- for item in order.line_items -%}{%- if item.variant.barcode != blank -%}{“gtin”:”{{ item.variant.barcode }}”}{%- unless forloop.last -%},{%- endunless -%}{%- endif -%}{%- endfor -%}]
I see no reference to SKU in there.
Thank you very much for your suggestion, merci!
The products attribute is only for barcodes, not SKU. Google uses the barcodes as the identifier. If you like to learn the technical details, have a look here: https://support.google.com/merchants/answer/7106244
Thank you a lot Emmanuel !
For the moment I will remove the code ”products” as it is mentioned optional by Google.
Also regarding the fa_language variable, I do not see any mention of CA (for Canada, as Odenium is based in Quebec), would it be ok for you if I add this line
{%- when ‘CA’ -%}{%- assign fa_language = ‘fr’ -%}
Thanks again
As Canada has both English and French, I have no way to set it to both, so by default I have updated the code to include English, but you can modify the code by changing it to French.
Thank you Emmanuel for your answer! 🙂
Hey Emmanuel,
You’ve been kind enough to offer input over on the Google Community pages. I’m now trying to get setup for Google Seller Reviews. After trying to follow their guide for a while, I found this tutorial. Thank you! It’s so much more straightforward than what Google has to offer and obviously doesn’t require me to lookup the proper Shopify objects.
I’m using the Dawn theme. I copied your code to the Checkout -> Order status page Additional scripts, per the tutorial, and it’s the only script in there. I made a purchase on my own site (using Chrome), but got no opt in at the end. So I tried again, this time using a different browser (Safari) which I had cleared of all history and cookies, and a different email address that had never been used on my site. Again, nothing. I get the confirmation screen and email, but no opt in pop-up.
I’ve re-coped and pasted the code, just to make sure. I definitely got all of it, from copyright line to copyright line. I double-checked my Merchant ID, and that’s right. My theme.liquid has the correct doctype declaration. But still, nothing when I complete the transaction.
Any suggestions?
Double check the additional scripts section where you add the code is the order status section, if you have multiple sections.
If that doesn’t work, you may try to check the browser developer tools to check if there are any errors, ie Javascript errors.
You can also double check the source code, to see if the data is populated.
Interesting…
https://drive.google.com/file/d/177wQxg_G4Z6Ma10__R5Nt-qZ3Pun4Mgw/view?usp=sharing
The transaction data aren’t appearing in the script. No idea why, though. My merchant_id and estimated_delivery_date are correct. I just checked and the liquid objects are definitely in the script, as copied from this page.
So I searched around a bit and found this thread. Sure enough, it’s the first_time_accessed conditional that’s causing the issue. As soon as I remove that, I get the pop-up.
I Googled a bit, and it looks like this has been an issue—or, at least, the usability of first_time_accessed has been questioned—for at least a couple of years. Some say it depends on the form of payment used. All of the threads appeared to end unresolved.
OK… Not sure what happened. I thought I had replied, but nothing is here.
Anyway, bottom line was that the first_time_accessed conditional appears to be unreliable. There are a number of posts supporting that on the Shopify Community. As soon as I removed that, the pop-up worked.
Hello Jason, thank you for letting me know. I will update the article to provide this advice. Thanks!
I have the refresh theme, It doesn’t work for it in theme liquid, How do you even get it to work on that theme?
If you have added the badge to your theme and it doesn’t work, that may indicate it’s incorrectly implemented or other coding is breaking Google’s code. I suggest you look at you browser console logs.
It worked! I accidentally put the wrong snipped code in on merchant center! Thanks for the tutorial
Pleasure, and glad to hear it worked.
Thank You so much for this amazing resource! Your work has been incredibly helpful to our small business!
We have a completely made-to-order business where we work with the customer to create custom products. Thus, our delivery window is really case-by-case. Is it possible to edit the code so that instead of delivering the google survey after a given number of days, we could change it to when fulfillment status is completed? Currently we have it set to 14 days delivery time, but some of our customers that have complex orders will receive a review request while their order is still in progress.
Thanks so much!
Hello Jonni, pleasure. That’s an interesting question. Basically, the x days you tell Google that the items are delivered are static values. I don’t see how you can dynamically change this. And I would recommend you use a review platform that can send manual invites, such as Trustpilot, etc. Here is a full list: https://support.google.com/google-ads/answer/2375474