Add Google Ads conversion tracking to Shopify quickly. Choose from three versions:
- Additional Scripts: Deprecated but still installable.
- Shopify Pixel: Direct installation with Google Ads, excluding enhanced conversions.
- Shopify Pixel with Enhanced Conversion & Micro Conversions + GA4: Available when installing via Google Tag Manager.
The Shopify Pixel Code is compatible with Shopify checkout extensibility.
Please note that users checking the code with Tag Assistant or developer tools will not be able to see the code, as Shopify pixels run in sandbox mode, which is not viewable.
Please also note that if you are installing this with Google Analtyics 4, that you will not be able to view the debug mode in GA4. But you can view the realtime data to verify it’s tracking.
Enhanced conversions will be reflected in the status details within a week, depending on your sales volume.
V2 Shopify Pixel + Enhanced Tracking + Micro Conversions + GA4
What is New?
- V1.05+ now supports cart data, for using cost of goods based bidding strategy in Google Ads
- V1.07+ now supports micro conversions + bug fixes
- V1.08+ now supports Google Analtyics 4 (optional)
- V2+ now supports remarketing & remove from cart
What is the difference between Micro and Macro Conversions?
When it comes to advertising, we have two types of conversions. Macro and Micro conversions. Macro conversions are the website’s primary conversions, such as completing an order or submitting a lead form. Micro conversions are smaller actions such as add to cart, view cart, add a delivery address, etc.
Requirements
You need access to the following accounts.
- Google Tag Manager
- Google Ads
- Google Analytics 4
- Shopify (Customer Events)
Let’s get started!
If you have not yet created a Google Tag Manager account, create one now.
Once the account is created, you should see a popup with your GTM tag, if you don’t see this, don’t worry, simply go to Admin > Install Google Tag Manager

Copy the tag id without GTM- as highlighted in the image below

Replace the following values in the settings:
- GOOGLE_TAG_MANAGER_ID
- Add your GTM tag ID
- GOOGLE_MERCHANT_CENTER_ID
- Add your Google Merchant Center account ID
- PRODUCT_COUNTRY_CODE
- Set your default country ISO2 code, for usage in product IDs
- ESTIMATED_SHIPPING_TIME
- Add your estimated shipping time
- GRANT_CONSENT
- Defaulted to false, if you set it to true, you are forcing to set consent_mode v2 to true, regardless what the use selected (not recommended)
- ID_TYPE
- Set your Google Merchant Center product ID format
- CAPITALIZE_SKU
- If you are not using the default Shopify IDs and you are using SKUs, you can choose to uppercase the value
In the code replace GTM-123456 with your GTM tag ID
You can get the code by registering here: https://merchantcodex.com/advanced-google-ads-tracking-for-shopify/
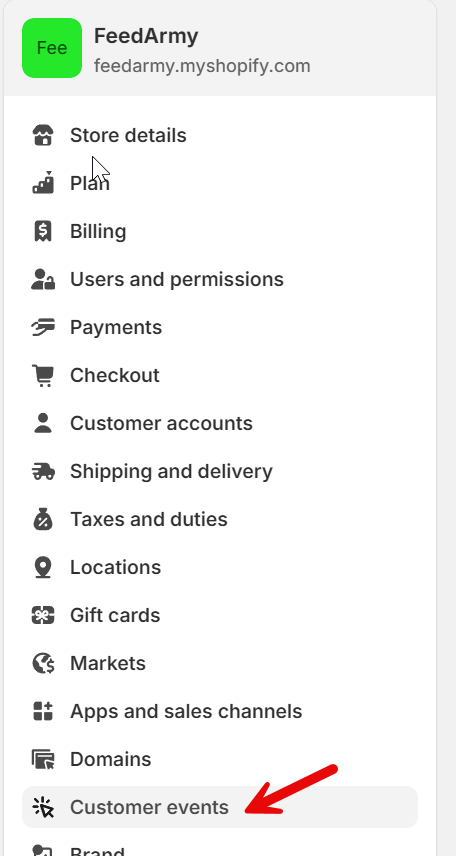
Go to Shopify > Settings > Customer Events
Click on add custom pixel
Paste your code, click on save and then connect.
In Google Tag Manager, go to admin > and click on import container.

GTM JSON File
In Google Tag Manager select the json file (you can find it in the downloaded file).
Chosing your workspace, click on existing and choose default workspace
Select Merge as the import option

Click on confirm

Go to Workspace > Tags > Click on Google Ads Shopify Pixel [Purchase] Tracking By FeedArmy

Hover over the tag and click on edit

Add your Google Ads conversion ID and Label when creating a new conversion.

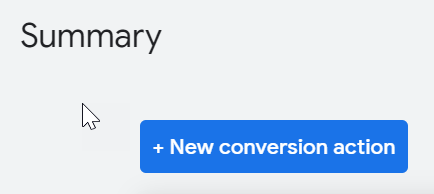
In Google Ads go to Goals > Summary > Click on New Conversion Action

Select website
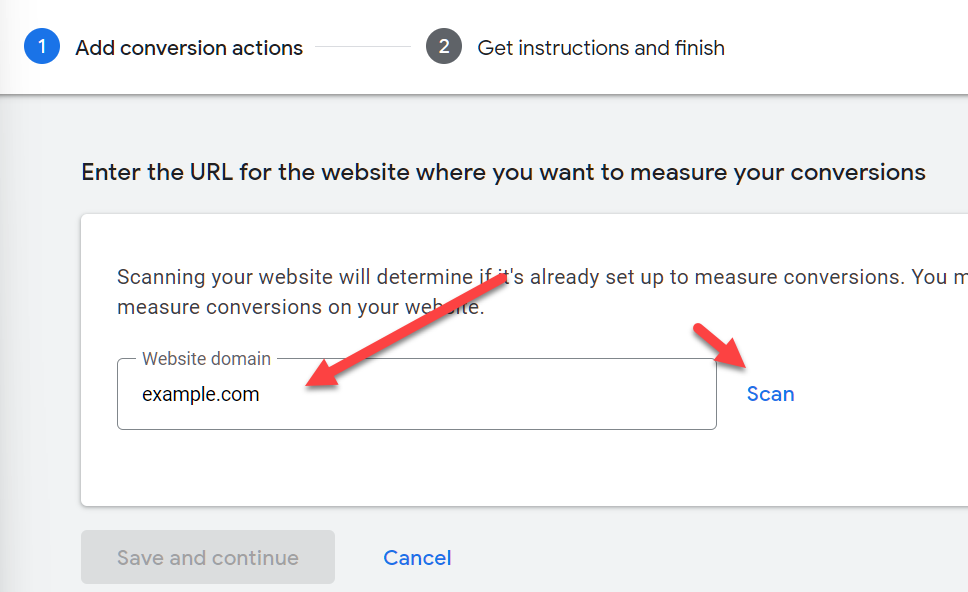
Enter any website domain, and click on scan
Scroll to the bottom of the page and click on Add a conversion action manually
Add your conversion action details:
For Goal and action optimization select purchase
For Conersion name, add any name, I recommend Shopify GTM Pixel
For the Value select Use different values for each conversion
Click on Done, then click on save and continue

Select Google Tag Manager and copy your id and label from Google Ads and paste it in Google Tag Manager

Now repeat the steps for the micro tracking (optional) (view the instructions video for more details) and ensure everything is set to secondary as goal, unless you know what you are doing:
- Add To Cart
- Remove From Cart
- Cart Viewed
- Begin Checkout
- Add Shipping Info
- Payment Submitted
- Search
- View Collection
Save the tag, and now lets publish the GTM container by clicking on Submit

Add a version name and click on publish

Let’s enable enhanced conversions in Google ads by clicking on done, then select your conversion action and click on ehanced conversions.
Check the box next to Turn on enhanced coversions
Check the radio button for Google tag or Googel Tag Manager and select next
Enter just a letter d, and click on check URL, as we want to force an error.
We can now click on select one manually

Click on Google Tag Manager > Next and click on save

Google Ads Remarketing
To enable the Google Ads Remarketing setup, we only need to copy the Google Ads conversion ID. You can find this by going to Goals > Select any website conversion action, such as the ones you just created, and copy the id.

And paste the conversion ID in the remarketing tag inside Google Tag Manager.

Google Analytics 4 Setup
Continue GA4 Installation: We now need to add our Measurement ID
- Tags:
- Google Analytics 4 Data
- Google Analytics 4 Page View

You can find your Google Analytics Measurement ID by going to:
- Google Analytics
- Cog Icon (admin)
- Under Data collection and modification, choose Data Streams
- Click on your data stream
- Now you can view and copy your measurement id

Now click on both tags, and add replace the G-1234 that I added, with your own measurement ID.

Support My Work!
https://www.trustpilot.com/review/feedarmy.com
or here : https://g.page/r/CbGZ-JICOoh1EAg/review
Trouble Shooting
Can Not See Data Layers
Because Shopify pixels run in sandbox mode, for privacy reasons, you cannot view data layers in your browser using conventional tools.
You will need to use a Chrome extension such as https://chromewebstore.google.com/detail/datalayer-checker-plus/blglfmihmnbhfgfbomofeljmididgfhe
Even then, it is only sometimes 100% working.
Zero Tracking
If nothing is working, even adding to the cart, that signals more serious issues. This means there is possibly a third-party app blocking pixels from working.
It’s also possible that your cookie consent is not enabling tracking, you can test by forcing the consent to be set as accurate in the code settings.
Some Conversions Are Tracking
If you notice that not all conversions are tracked in Google Ads, this signals that the payment method you are using is not sending back the correct data to Shopify. This is a known issue with third-party payment methods, even with the old additional script method.
Conversion Not Working
If your conversions are not working, then most likely your theme checkout and thank you page are not published.
Go to Shopify > Online Store > Themes > Click on Customize

Click on the home page drop down and select Checkout and new customer accounts
Click on checkout drop down and choose thank you and or checkout (whichever says unpublished)
Click on the sections button and publish.

You can also check if your checkout domain matches your domain. In some cases the domain name is myshopify.com instead of your domain.
Google Analytics Average Engagement Time Per Session
When using Shopify Pixels / Customer Events, and due to Shopify using sandbox environment, automatic events, including engagement event for Google Analytics aren’t triggered.

Change Log
- 18 January 2025: V2.0026 Updated remarketing tags (they where not complete before)
- 29 October 2024: V2 Includes remarketing, remove from cart micro conversion.
- 6th October 2024: V1.0816 Fixed purchase report issue in GA4 (just update the pixel code in Shopify)
- 2nd September 2024: v1.0814 Fixed the pixel code to correctly show the item_id instead of the id (For GA4).
- 2nd September 2024: V1.0813 Fixed an issue with event naming convention
- 25th August 2024: V1.08+ now supports Google Analytics 4
- 8th August 2024: V1.07+ now supports micro conversions + bug fixes
- 16th July 2024: Updated GTM enhanced conversion data to be lowercase, as per documentation and highlighted by Lowie Verschelden
- 14th July 2024: Added V1.05 cart data, so that you can use Google Ads cost of goods based bidding.
- 18th June 2024: Added conditional checks for enhanced data to avoid listing empty values
- 10th June 2024 : Updated GTM Container, incorrect mapping of some variables (to update please delete all variables in GTM, and re-import with merge option)
V3: Local Inventory Feed Support
Version 3 includes everything from Version 2, plus full local inventory feed support for Google Merchant Center.
You can get the code here. Begin by adding the code to Shopify, then follow the Version 2 steps before updating your local settings as shown below.
Local Settings Setup
Add your local configuration values in the pixel code:
const LOCAL_TARGET_COUNTRY_CODE = 'US';   // ISO2 country code (e.g. "GB" for United Kingdom)
const LOCAL_LANGUAGE = 'en';              // Alpha-2 language code (e.g. "de" for German)
const LOCAL_STORE_CODE = '1234';          // Google Business Profile store code
- Country Code (ISO2): If unsure, search online (example: United Kingdom ISO2 code =
GB). - Language Code (Alpha-2): Again, search online if needed (example: Germany alpha2 code =
de). - Store Code: Your Google Business Profile store code.
Upgrading from Version 2
- If you are already using Version 2, upgrade to Version 3 by importing the V3 update file in Google Tag Manager.
- If you have never installed FeedArmy tracking before, follow the Version 2 tutorial first. Once complete, continue with the V3 setup.
Be sure to save your Shopify pixel once all changes are applied.
Once installed and you have waited 2 days, fill out this form: https://support.google.com/merchants/contact/website_reported_product_feeds#
To get your API Key.
Full Documentation: https://support.google.com/merchants/answer/15845643
Shopify Pixel
This Shopify Pixel / Customer Event code, has been tested and verified as working for Shopify merchants that have enabled Checkout Extensibility.
The first step is to get your conversion id and label.
Log in to Google Ads and go to Goals > Conversions > Summery

Click on the blue button that says + New conversion action
Select Website as your conversion method.
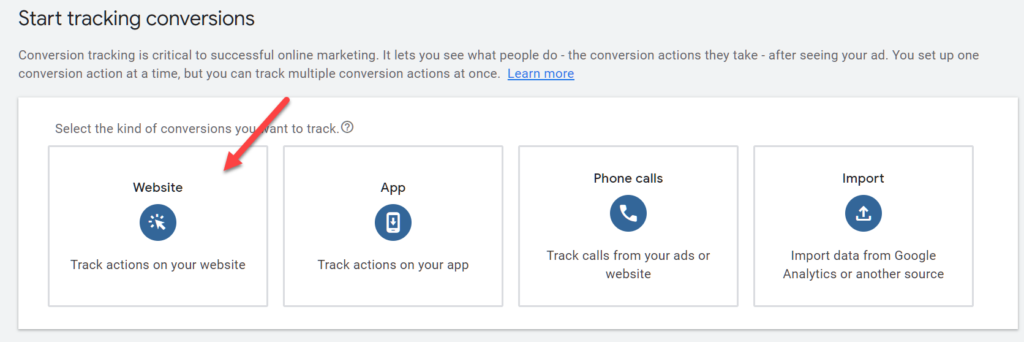
Enter your website address, and scan.
If you see a banner that says to use Google Analytics, then click on Use Google Ads only

Click on +Add conversion action manually.
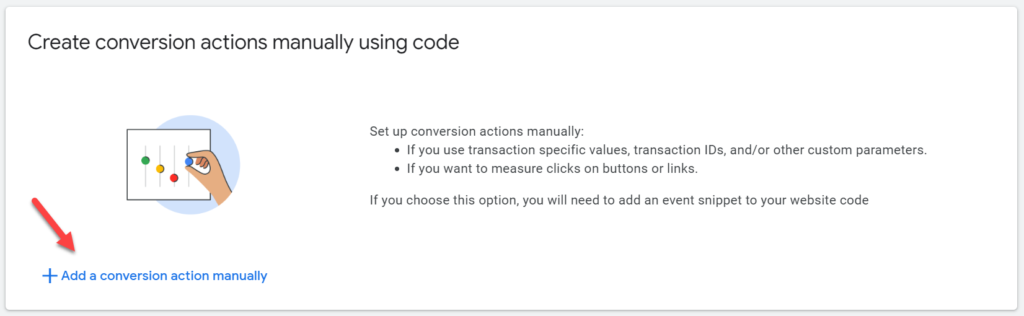
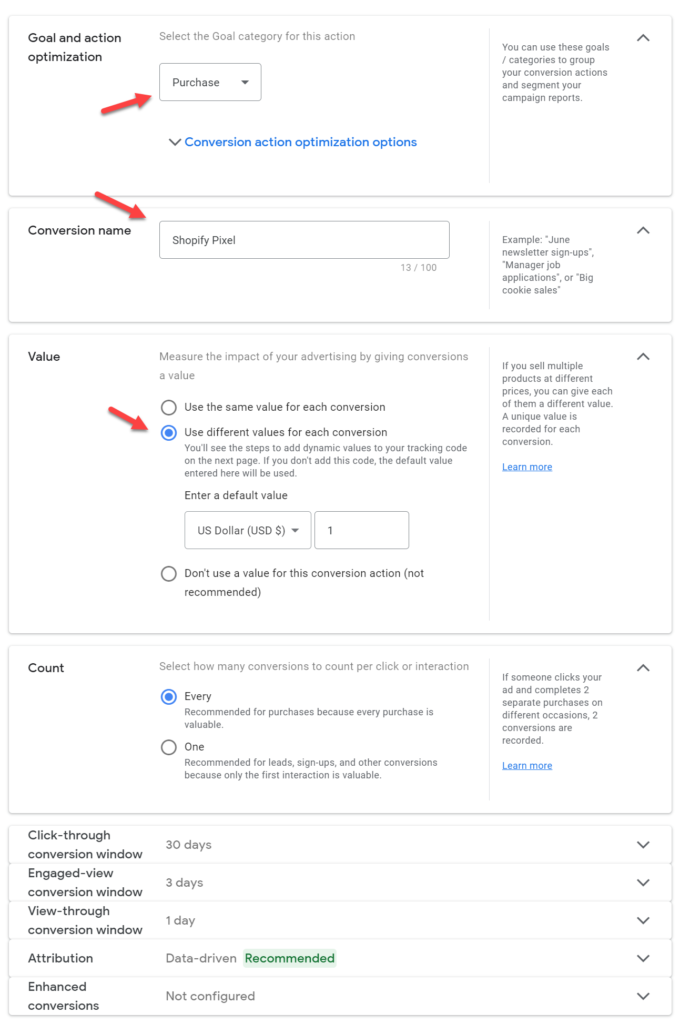
- Choose Purchase as your Goal and action optimization
- Enter any conversion name, I will call it Shopify Pixel
- Select Use different values for each conversion
- Leave the rest unchanged and click on done
Click on See event snippet

Copy the code and paste in a temporary text file, we will copy some details at a later stage.
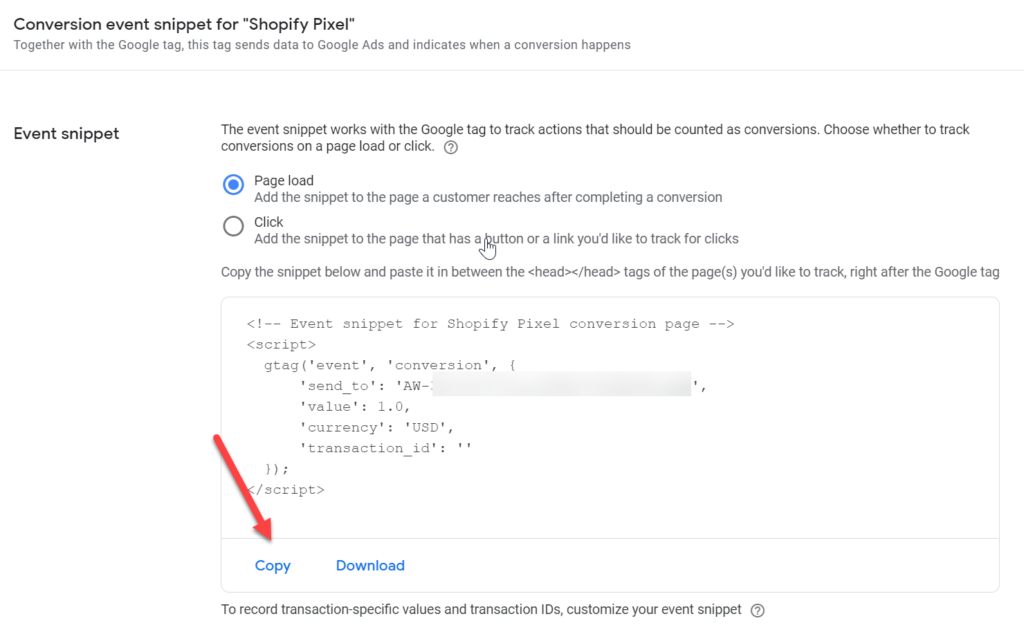
Click on Done.
Now go to Shopify > Settings > Customer Events
And click on Add custom pixel
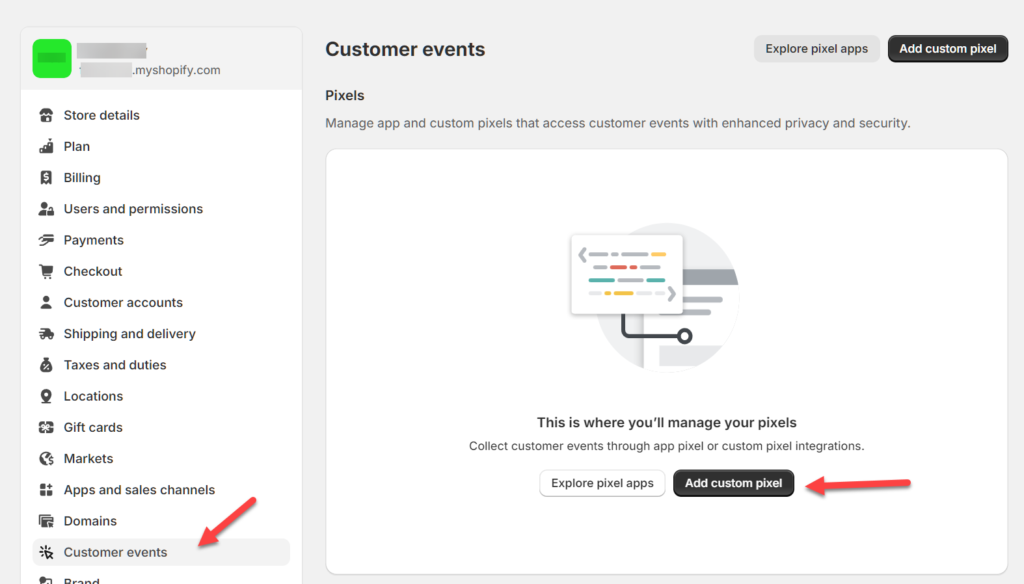
You can give it any pixel name, but I will call it Google Ads Conversion. Now click on Add pixel.
When editing the code below, please do not remove or change the author, and respect who built it.
// Created by FeedArmy V1.04
Paste the below code in the Shopify pixel.
// Created by FeedArmy V1.05
const script = document.createElement('script');
script.setAttribute('src', 'https://www.googletagmanager.com/gtag/js?id=AW-123456789');
script.setAttribute('async', '');
document.head.appendChild(script);

window.dataLayer = window.dataLayer || [];
function gtag(){dataLayer.push(arguments);}
gtag('js', new Date());
gtag('config', 'AW-123456789', {'allow_enhanced_conversions':true});

analytics.subscribe("checkout_completed", (event) => {
  gtag('set', 'user_data', {
    email: event.data?.checkout?.email,
    phone: event.data?.checkout?.phone,
    address: {
      first_name: event.data?.checkout?.shippingAddress?.firstName,
      last_name: event.data?.checkout?.shippingAddress?.lastName,
      street: event.data?.checkout?.shippingAddress?.address1,
      city: event.data?.checkout?.shippingAddress?.city,
      region: event.data?.checkout?.shippingAddress?.province,
      postal_code: event.data?.checkout?.shippingAddress?.zip,
      provinceCode: event.data?.checkout?.shippingAddress?.provinceCode,
      country: event.data?.checkout?.shippingAddress?.country,
      countryCode: event.data?.checkout?.shippingAddress?.countryCode,
    }
  });

  gtag('event', 'conversion', {
    send_to: 'AW-123456789/abcdefg123456789',
    transaction_id: event.data?.checkout?.order?.id,
    value: event.data?.checkout?.subtotalPrice?.amount,
    currency: event.data?.checkout?.subtotalPrice?.currencyCode,
  });
});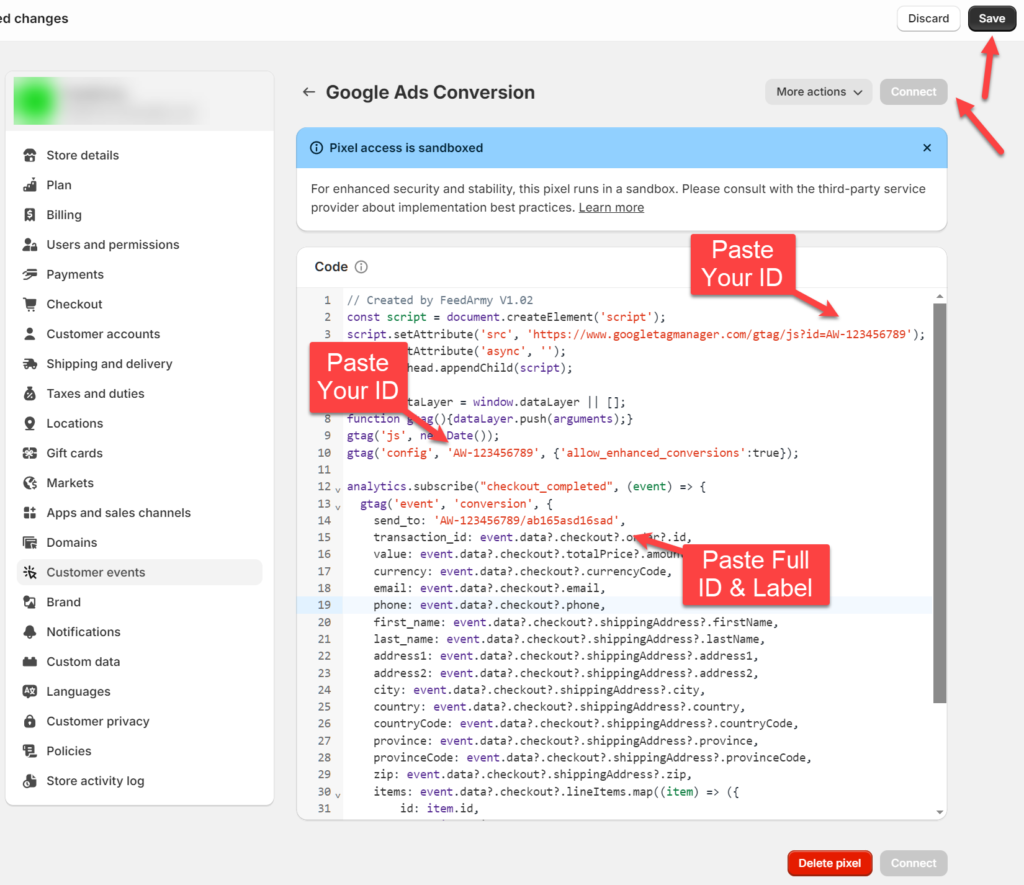
From your previously copied code from Google Ads, copy the AW-123456789 id highlighted in the image below.
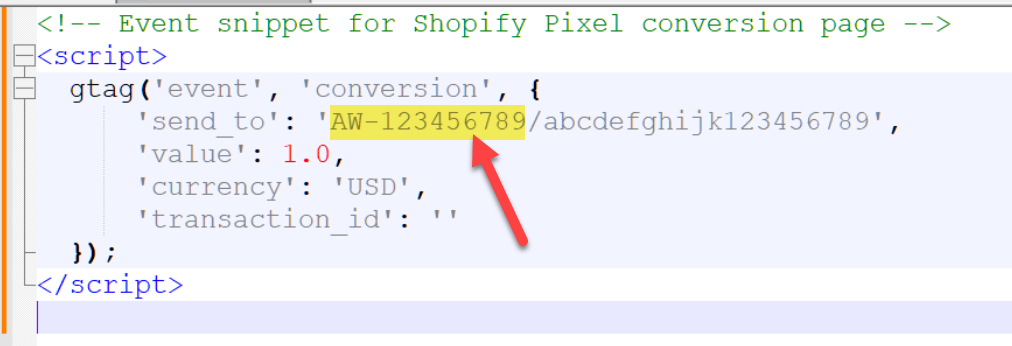
And paste it twice on row 3, and row 10, by replacing the existing ID AW-123456789 (shown in red in the image above)
Go back to your Google Ads code and now copy the full ID and Label as highlighted in the image below.
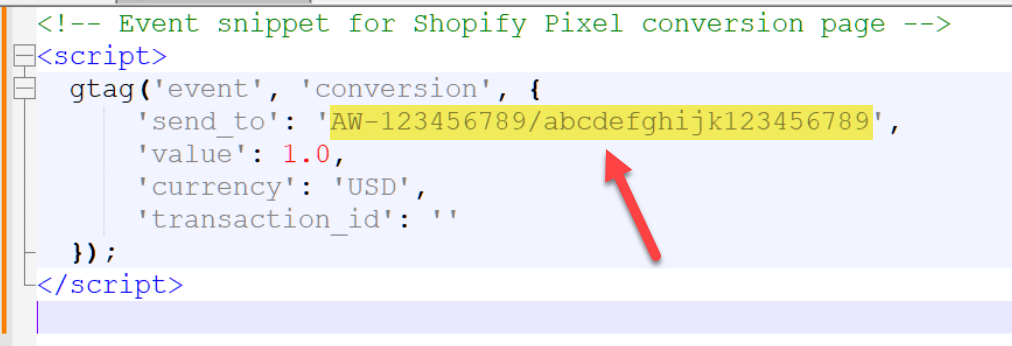
Replace the send_to value between the quotes on row 14. (shown in red in the above image)
Now click on save in the top right corner followed by clicking on Connect, accept Shopify terms and conditions. And you are all done.
Testing
You can’t test code on Shopify’s checkout thank you page because it’s in sandbox mode, meaning tools like Google Tag Assistant or GTM Preview Mode won’t work. If you want to check data layers, you need to use a chrome extension such as https://chromewebstore.google.com/detail/datalayer-checker-plus/blglfmihmnbhfgfbomofeljmididgfhe
Change Log
- V1.05 – 20 May 2024: Changed the order of gtags
- V1.04 – 20 May 2024: Added user_data values after Sve (comment below) confirmed Google’s own version. I already built this months ago, but needed confirmation it’s correct.
- V1.03 – 02 March 2024 : Supports multicurrency and used subtotal price instead of total
- V1.02 – 27 February 2024 : Public Release
HI, how deal with multiple countries?
the variable PRODUCT_COUNTRY_CODE is for one country but what happens if the sales and ads comme from different countries?
product ids should be the same for all countries. If that is not the case, I recommend you update your feeds to use the same IDs. Otherwise you will end up with 1 code for every country, which will bloat your website for no real reason.
Hi, how do i use your code together with stape?
Stape has there own code / app for tracking conversions.
I looked at their gtm-file and its not as complete, but thanks for the answer.
Hi,
In GTM we have the variable ecommerce.aw_merchant_id, shouldn’t it be included in the dataLayer?
aw_merchant_id: “123456789”
The code is all correct as is. If you want to learn more, have a look here: https://support.google.com/google-ads/answer/14943675?hl=en
The FeedArmy GTM script is being sandboxed by Shopify’s new checkout system, so your custom
purchasedataLayer event isn’t firing reliably anymore. I’m losing conversions in Google Ads. Should i remove the setup in GTM and switch to Google/Youtube app so that it is compatible with Shopify’s new native pixel events instead of legacy DOM/dataLayer methods?Pixels / Customer Events are always in sandbox mode, ever since Shopify launched this feature.
You can indeed try to see if the google and youtube app is better in your situation.
Hello, I am having issues with a client on shopify with the tracking, no parameters are populating even though the remarketing code looks like its tracking right up to the checkout. I’ve installed the remarketing code and the conversions on customer events under two custom pixels. we also have the Google and Youtube app, and my client has added the app Pandectes GDPR for Google Consent V2 as well. We are not currently using GTM. Do we need to change our settings to this tutorial instead? I am a bit lost in terms of why the tracking isn’t working. We’ve not run ads yet.
If you want to keep using the google and youtube app, contact Google support here: https://support.google.com/merchants/contact/shopify_3p_support_app
Hello Emmanuel,
We setit up everything. All the tracking shows active, however after 24 hours we can see add to cart and begin checkout values but purchase shows 0. Any idea what could be the reason? I run some test with Chatgpt help, and according to chatgpt:
Your thank-you page is not sending any hits. That means GTM is not loading there and your Purchase tag never fires. Add-to-cart works because it fires on storefront pages where GTM loads. Checkout/thank-you is the blocker.
We inspect the thank you page through the developer/network tab.
Thanks.
I recommend testing out with the google and youtube app, to see if you have the same issue. If yes, then something is blocking.
We actually tried that first, due to the unmatching product ID issue, we wanted to try your way. Google and the YouTube app were working. I mean, it was showing the total conversion value, but not individual SKU sales. So, not sure what we did wrong here.
Usually if you followed the troubleshooting guide, and it still doesn’t work, then it will not work. I recommend using something like stape
Sent you guys an email through the pricing page!
If we already have the say “Google shopping add to cart” before this whole shopify mirgration thing. And then we followed the guide line on the video, would that make “Google shopping add to cart”. duplicated with “Shopify GMT Add to cart”? Do we even have to turn on the google tag manager on shopify? Love your content thanks a lot.
If you want to use this tracking code, yes, you will need to use GTM. But if you already have the google and youtube app enabled, then no need to use this code.
Hi, will the Google & YouTube plugin conflict with the Shopify pixel? I set up the Shopify pixel according to your instructions, but I’m using the Google & YouTube plugin to sync my feed to Google Merchant Center. However, I removed “app purchase” from my Google Ads dashboard. Will this cause a conflict? Do I need to uninstall the Google & YouTube plugin if I want to use the Shopify pixel?
Yes it will most likely conflict, you need to check if you are having double tracking. I recommend for the data feed to use multifeeds.
If I want to use Shopify pixel, is it better to uninstall ” Google & YouTube” App?
No, just disconnect Google Ads in the Google and Youtube app.
I would also like to ask, when using Shopify pixel, in addition to adding the code in the customer event according to the above steps, do I also need to add the “google tag” between the <head> and </head> of the Shopify backend theme liquid?
Only follow the instructions in the tutorial. Anything extra you do, may cause issues with tracking, such as double tracking.
Hi Emmanuel,
I add the Shopify pixel in the Customer Event section, but it only runs when specific events (like a purchase) occur, so it doesn’t load the Google tag on all pages. If I want the Google tag to run sitewide while using Shopify pixel, should I add the google tag in the theme.liquid file, or is there another way to make it load on every page?
If it doesn’t work, please check the troubleshooting guide. Don’t do anything extra not mentioned in the guide.
Hi, great info… What cookie-consent do you recommend? i use shopify.
That depends, please check with your countries laws what you need to do. I also explain in the video what you choose is different for every merchant.
Yes, i know the laws, its a jungle with rules… I have been controlled by google three times already. Its so much info that google wants if you use ads 🙂
And then the app need to do its thing 🙂
Indeed, I struggle myself with all the laws, long gone are the simple days 🙂
Hello and thanks for the tutorial. I have two questions:
There are some unclear points in the Feedarmy script related to the presence of “?” Are these correct or are they syntax errors? Specifically:
ecommerce: {
currency: event.data?.productVariant?.price?.currencyCode,
value: event.data?.productVariant?.price?.amount,
google_business_vertical: ‘retail’,
items: [items]
}
No, do not install any code anywhere else, not mentioned in the tutorial.
As to why there is a question mark, please check the official documentation: https://help.shopify.com/en/manual/promoting-marketing/pixels/custom-pixels/gtm-tutorial
Thanks for your feedback 🙂
Unfortunately, when I import the Feedarmy json container into Google Tag Manager, I get this error message: “No Google tags found in this container.”
I’ve carefully checked and applied all the settings in the tutorial. Do I need to manually create a Google tag into Google Tag Manager? By creating a Google tag, I no longer get the error message.
If it’s a google tag, simple add it yourself. This is something new Google has for GTM. You can add it, by following the instructions (usually 1 click) when you see the message.
Its great that you recommend stape, could you do a video on how to setup conversion tracking with stape please?
Good Idea
Hi Emmanuel, with this string of code you are using to tack value
value: event.data?.checkout?.subtotalPrice?.amount
are you only sending the value of the products included into the cart or the full amount paid by the customer, shipping costs included?
Thank you
Subtotal is the price of the product only.
Hey Emmanuel,
If the setup is now done through the Google and YouTube app, I’m concerned that the app is sending ecomm_prodid for dynamic remarketing instead of the new id parameter, and at the same time the match rate shows 0%. I can’t understand if the default app doesn’t work with dynamic remarketing at all and if your solution needs to be installed instead? Thanks for the feedback!
I believe the Google and youtube app works. Google still uses both ecomm_prodid and id values
I also think so, but every time with this app it shows 0% match rate in every account I see and that’s strange. Or do you think Google still matches them with old parameter ecomm_prodid but shows match rate only for the new “id” parameter?
I recommend you go here: https://ads.google.com/aw/productlinks/datasourcestats/googletag and check if the IDs match manually.
Hello, I hope you are well, can you tell me if you have any information for ecomm_prodid to appear with “ZZ” instead of “BR” (shopify_BR_806****872_4870******12) in my products?
That is from the google and youtube app.
Hey, Emmanuel,
I have followed your tutorial and everything went flawlessly, however my google ads shows “misconfigured” on all the conversions.
Do you have any idea what might be the reason? Actually I not yet have any ads active. But it might not be this, does it?
You don’t need active Google Ads campaigns for the conversion actions to be detected. Misconfigured can mean a lot. If the troubleshooting guide doesn’t work, then try using the google and youtube app, this doesn’t require any setup.
Thank you for your reply. After a testorder the “purchase” conversion goal changed to “active”. But the 3 other goals (add to basket, begin checkout, pageview) still show “misconfigured”, saying
“Make at least one conversion action primary to optimise for this goal.”
But your video shows to set all expect of “purchase” to secondary. Do I need to connect the 4 goals in some kind together?
thank you in advance for a short reply.
This might be related to enhanced conversions, which is not supported for non purchase events. This can be ignored, considering for example add to cart, is not eligible for enhanced conversions.
How to get the FeedArmy script code
Here is the link: https://feedarmy.io/product/enhanced-tracking-pixel-for-shopify/
Hey Emmanuel,
What do you think of the message everyone has been getting regarding migrating the tags?
Are you going to be migrating?
This means losing on the manual conversion tracking and solely depending on the Google & YouTube App on Shopify
The email you received is misleading. It’s primarily an attempt to drive new Google and YouTube installations by using scare tactics. To be clear, using Custom Pixels does not present any issues.
Thank you!
Just imported JSON and following the setup instruction, unfortunately, there is noGoogle Ads Shopify Pixel Conersion Tracking By FeedArmy
I have updated the article, it should be Google Ads Shopify Pixel [Purchase] Tracking By FeedArmy
Hello dear, When was the update made?
On the day I said I updated the article.
I used this version: Full Import V2.0026.json. Is it correct?
Just to clarify, I was only indicating that I updated the article. Specifically, I revised some wording to correct inaccurate references—nothing else was changed.
In my begin_checkout event the products array (items) is equal to [{0: “[object Object]”}]
I will check, as far as the latest version tested on a clean install, it worked correctly.
My ADS TAG only sends Remarketing TAG until add to cart, what could it be? Retail hits % is 0%, is there anything I can do to solve this?
Hello Andre, I recommend checking the troubleshooting guide. Have you done this? If it all fails, then some kind of app is blocking pixels in the checkout. And in that case I recommend testing a different solution to see if it works.
Sorry, just to know if it’s up to date, as I’m having trouble sending data to ADS, even though everything is ok in the GA4 live view.
The current version is working as is, yes.
This is Over?
Unfortunately I do not know what you are asking.
Hey, what do we do if checkout domain is the shopify domain. what’s the fix?
Enable cross domain conversion tracking in GTM.
Hi Emmanuel,
Thank you for taking my question. I previously had your Google Tag Manager (GTM) set up for Shopify, and it was functioning well. However, after Shopify made some changes, it stopped working. I had to delete everything and start over. This time, when I set up the tags, it required an aw-xxxxxx tag, which I added.
I have waited a week, and while some of the tags are active, there haven’t been any recent conversions. Today, I received a notification from Google stating that Enhanced Conversions are not set up and that I should schedule an appointment. Should I wait, or is something wrong?
I tested the pixel, and all seems to be fine. The checkout and thank you page are published.
I would appreciate any help or guidance you can give me.
To be 100% sure, I recommend making a test purchase after you click on an ad, then check after 24 hours, if the purchase was recorded.
I did do this as well, and the purchase tag went from inactive to no recent conversions. Today, the add to cart finally had 1 conversion from another item. So maybe working?
Thanks for all your hard work in making this happen for all of us. I appreciate it.
If you did a test purchase, and it did not record a sale but did record an add to cart. That means, the checkout is not working. Check the troubleshooting section on this article, for the checkout. And also check if your checkout is not on a different domain, as then you need to add cross domain conversion tracking in GTM.
Hi Emmanuel. Thank you very much for the content!
I went through the entire process, but when I go to Audience manager>Your data sources, it shows that the Google Ads Tag has not yet been added to my website and gives me the option to start configuring the Tag.
Can you tell me why?
It takes 2 days for the remarketing data to show up. It is possible you need to configure the settings the first time. The tutorial is written from the perspective assuming you had a previous setup already.
Hello, I have installed the pixel on my website as per your instructions, and it works perfectly on the desktop. However, it fails on mobile. During my test checkout, I noticed that my domain changed to shop.app, which is Shopify’s domain, and subsequently, all tracking became invalid.
You might want to look into GTM conversion linker for cross domain
Hi!
We’ve installed your pixel successfully some weeks ago. Now we do encounter issues a) in the tag manager, saying GTM tag can not be found on checkout pages (others yes) and b) in Google Ads, saying enhanced conversions are set up but no attributes for enhanced conversions come with the tag. So, I’m wondering, could this be related to the V2 consent mode? Or do you have any idea what we might need to change in the setup?
Detecting enhanced conversions, usually takes a few weeks for Google. I don’t know if cookie consent slows down the data collection. But the more conversions you have, the faster it usually is.
Ok, thank you. But we actually didn’t have the issue after switching from the standard Shopify Google channel to your script. So I was wondering what initiated the change… Other than that – Can you imagine why the tag can’t be detected on the checkout page? All other tags (Adwords, Analytics) are present there…
If you have already looked at the troubleshoot guide on this article, then I do not know what your issues could be. Shopify doesn’t really assist with this kind of issue, and I have tried to find out why for a year now, with no results. So unfortunately I don’t know. Other then, it’s some kind of 3rd party app blocking it (my guess). The code works on a clean install with no 3rd party apps.
Hi Emmanuel,
First of all, thank you for the solution – I’ve implemented your script using Shopify’s Custom Pixels, and I can confirm that ecommerce events are working properly in the GA4 real-time report.
However, I also need to track additional events on my website, such as form submissions and email signups, and I want to set those up using GTM
Here’s where I’m running into some issues:
Can you advise what would be the best way to proceed in this case?
Should I add the standard GTM snippet manually in the
theme.liquidfile to enable Debug Mode and still keep your eCommerce tracking? Or is there a way to adapt your solution so I can work with other events via GTM?Please use the chrome extension, I mention in the article.
Hi, does it work with the dynamic buybuttons in shopify?
I don’t know what that means. All data is pulled from Shopify predefined data (with modifications) and triggers. I recommend testing out the code.
Hi Manuel,
I hope you’re doing well! I noticed a message in GTM that says:
Could you please help me understand why this is showing up?
Is there a Google tag missing or something that still needs to be configured?
I have implemented – 18 January 2025: V2.0026 Updated remarketing tags (they where not complete before)
Hello Milen, I recommend having a look at the help document below, to see if you can resolve the issue: https://support.google.com/tagmanager/answer/14681508