

Easily add Google Ads conversion tracking to Shopify in less than 15 minutes.
Shopify Pixel

This Shopify Pixel / Customer Event code, has been tested and verified as working for Shopify merchants that have enabled Checkout Extensibility.
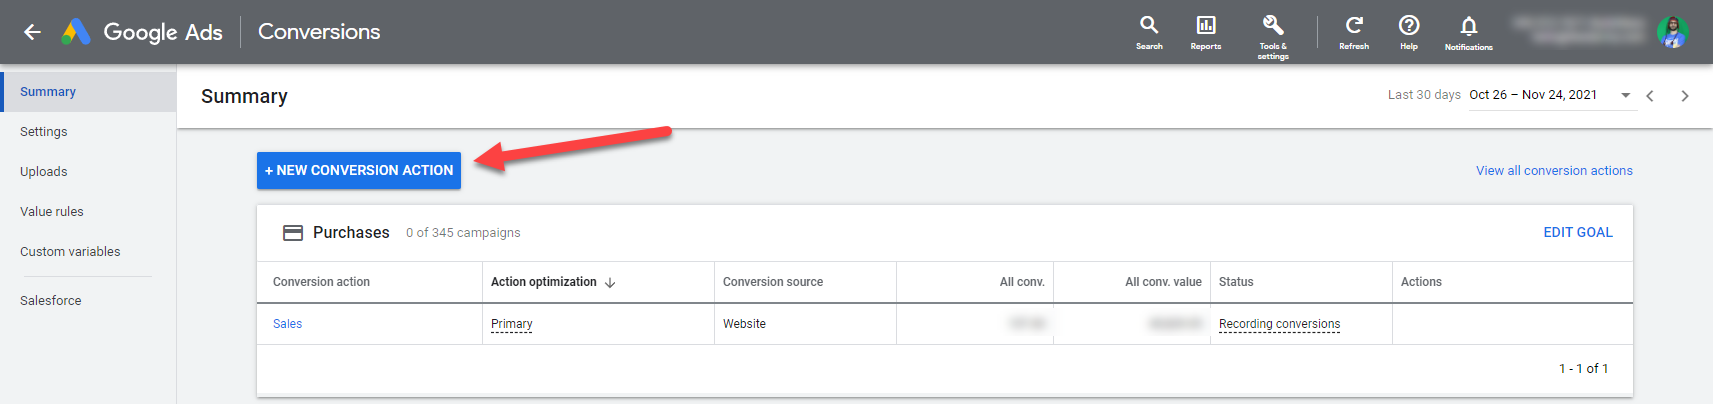
The first step is to get your conversion id and label.
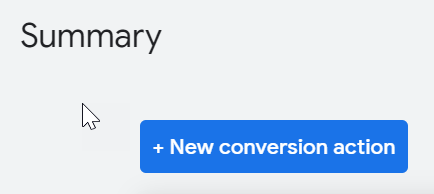
Log in to Google Ads and go to Goals > Conversions > Summery


Click on the blue button that says + New conversion action

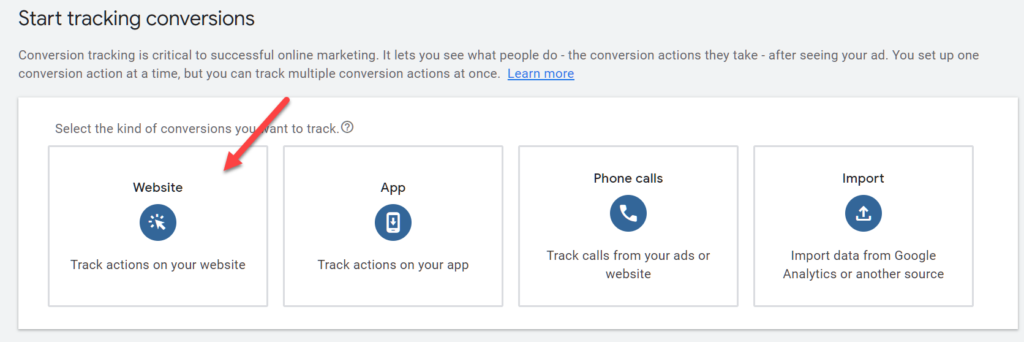
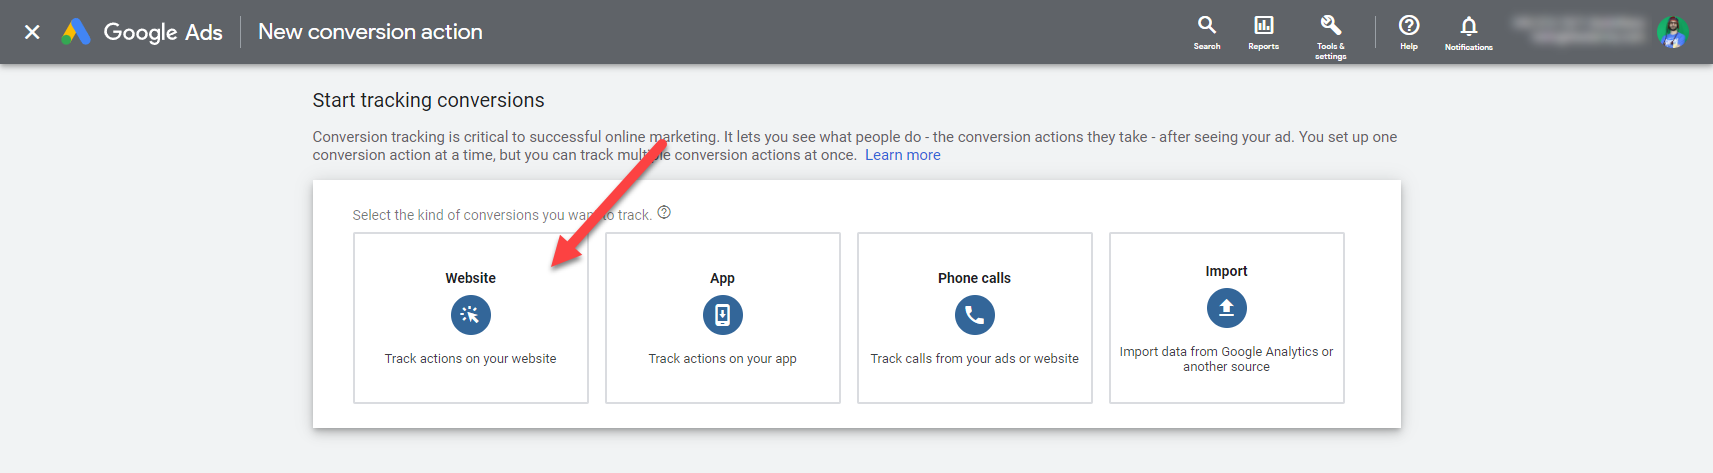
Select Website as your conversion method.

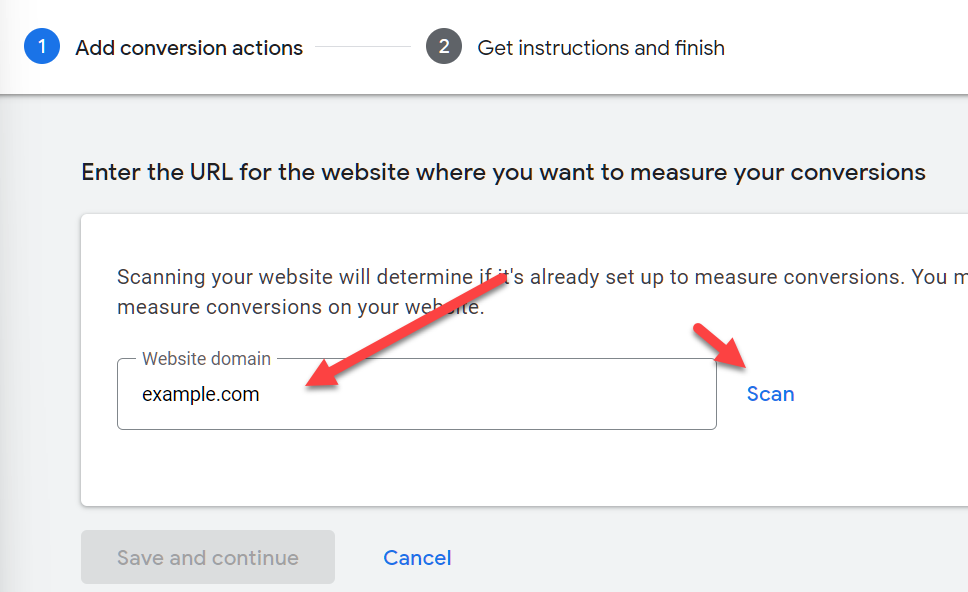
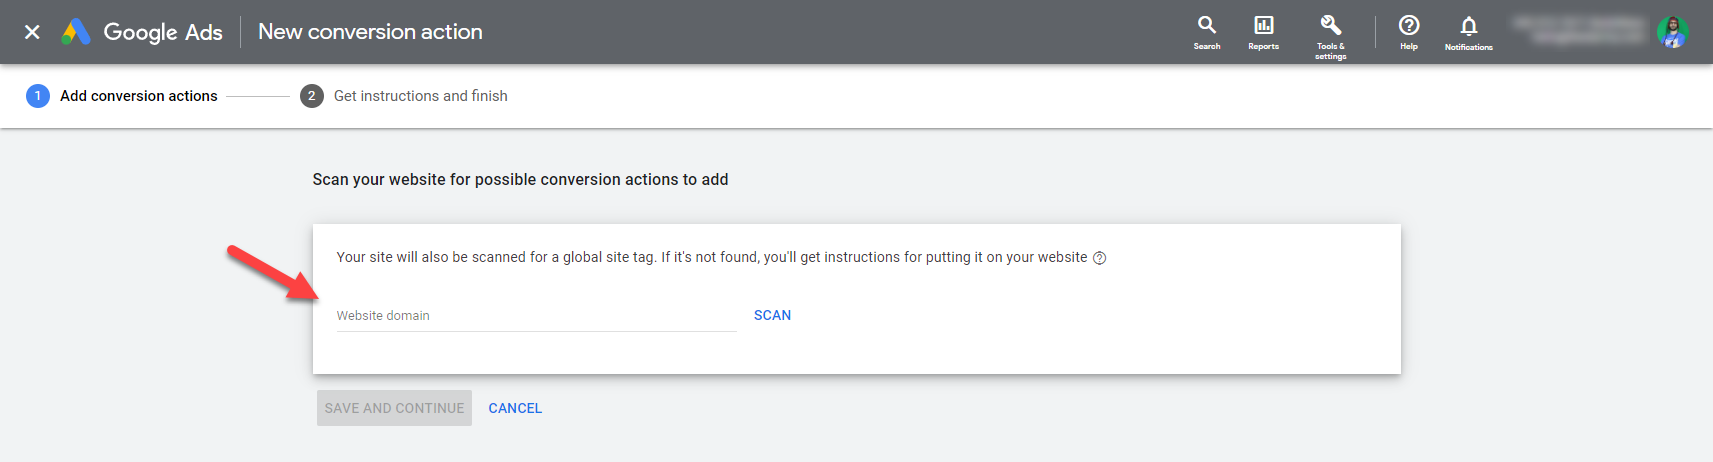
Enter your website address, and scan.

If you see a banner that says to use Google Analytics, then click on Use Google Ads only


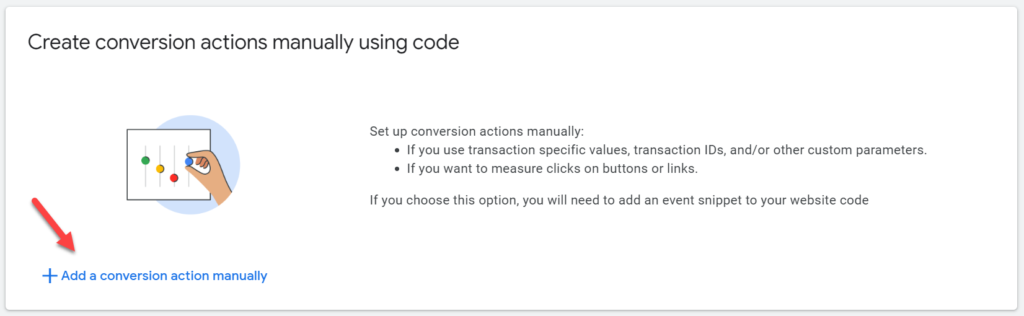
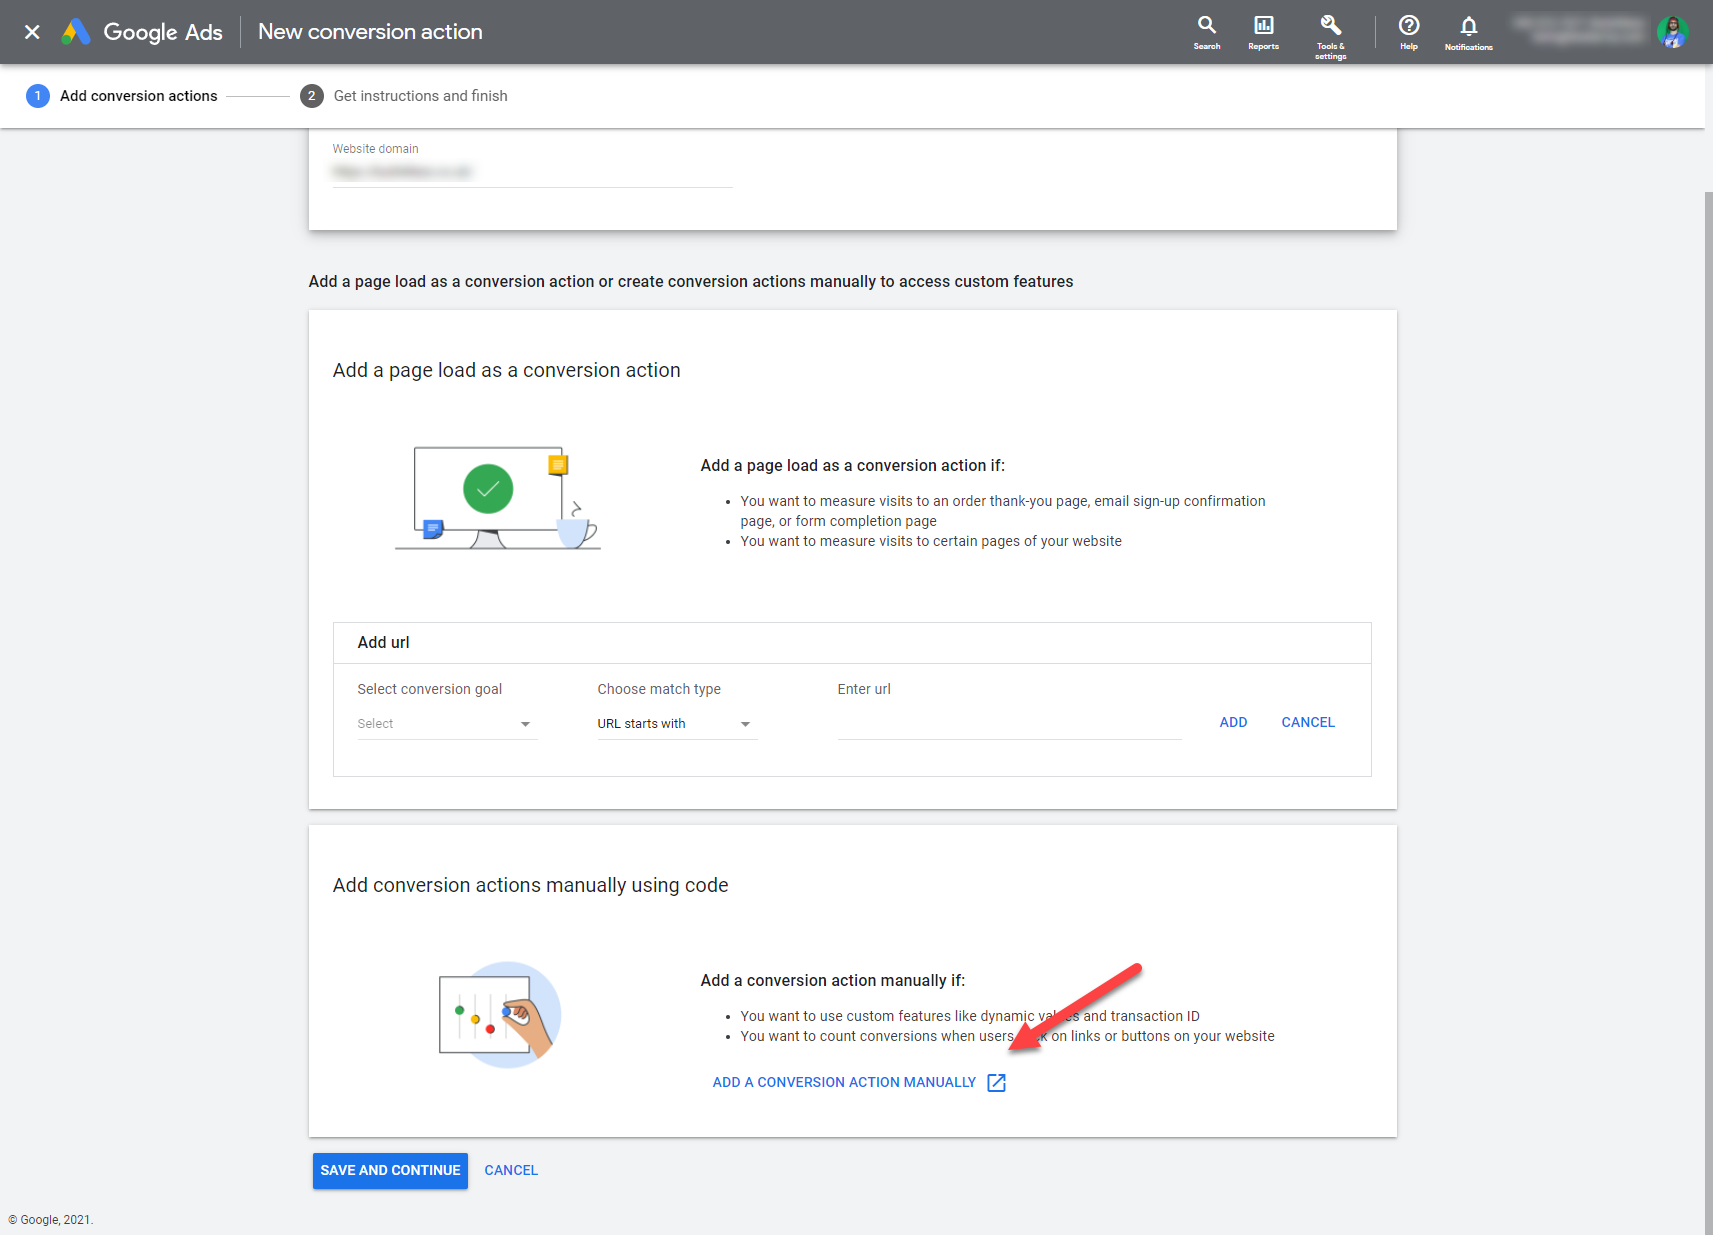
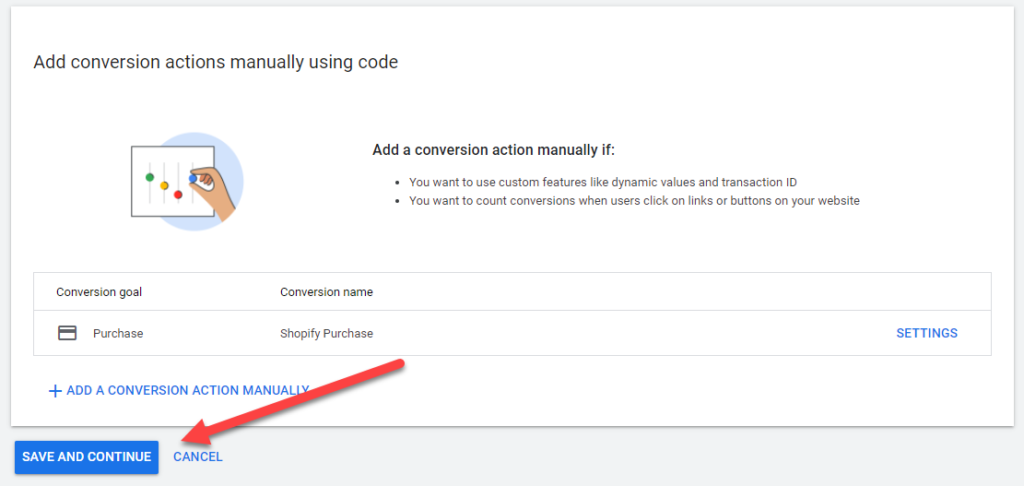
Click on +Add conversion action manually.

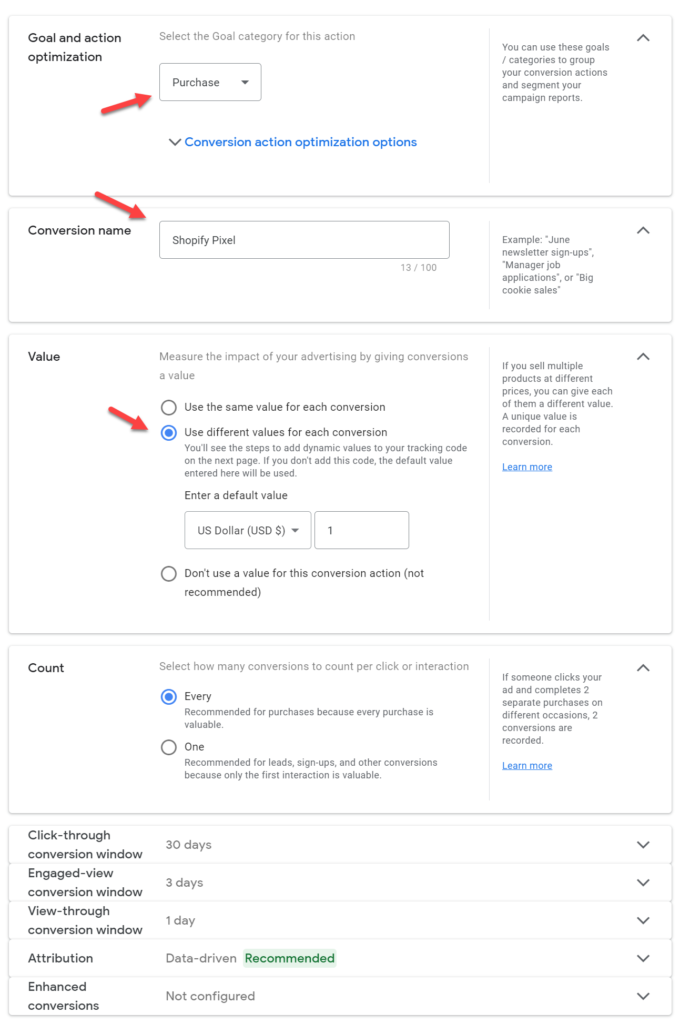
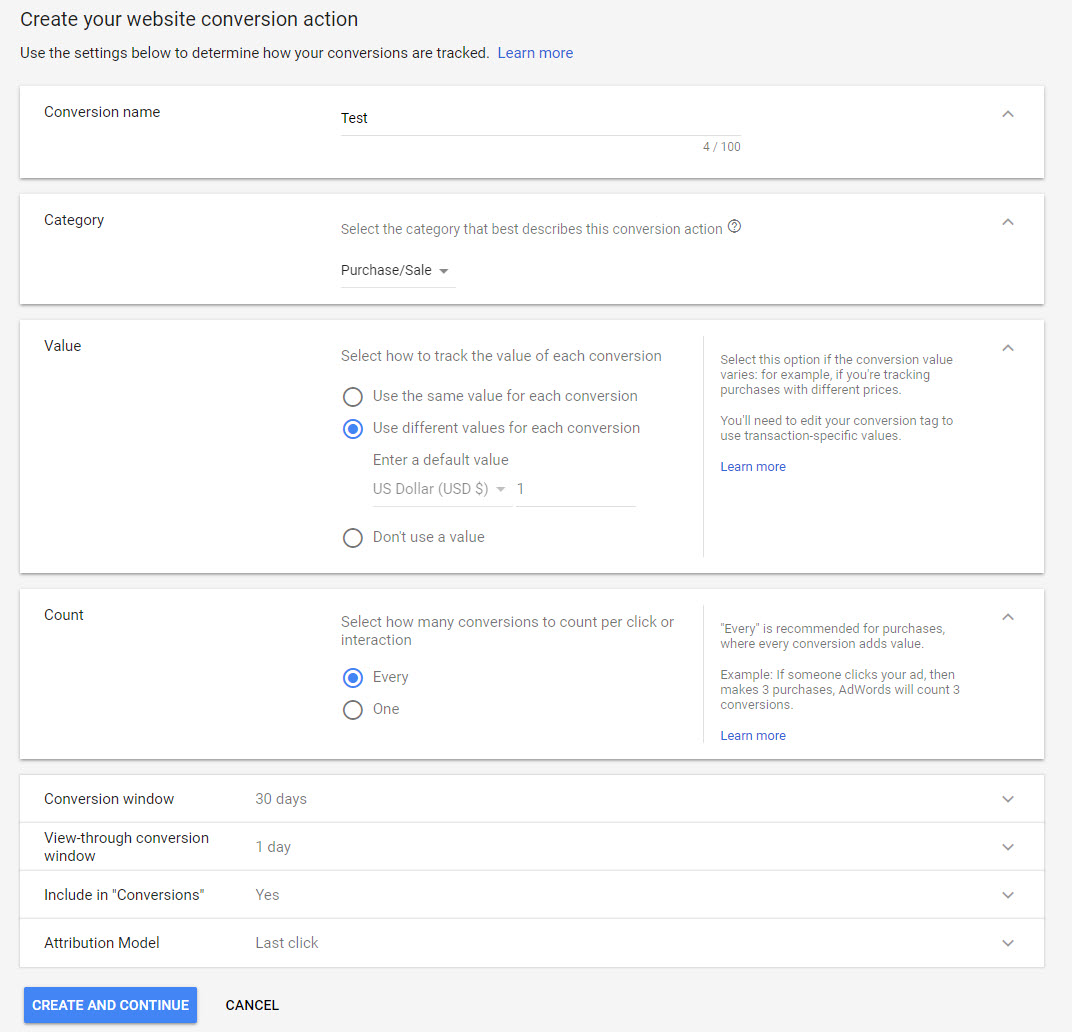
- Choose Purchase as your Goal and action optimization
- Enter any conversion name, I will call it Shopify Pixel
- Select Use different values for each conversion
- Leave the rest unchanged and click on done

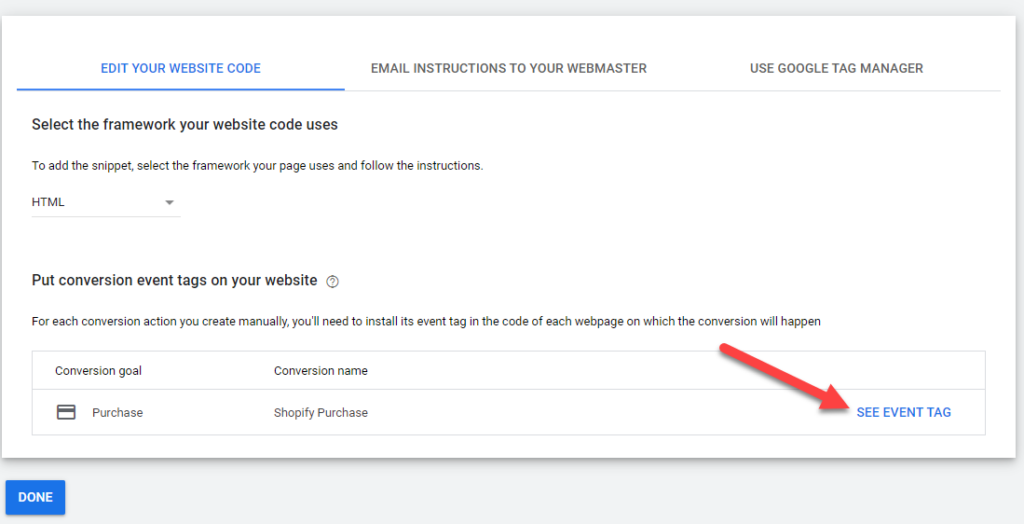
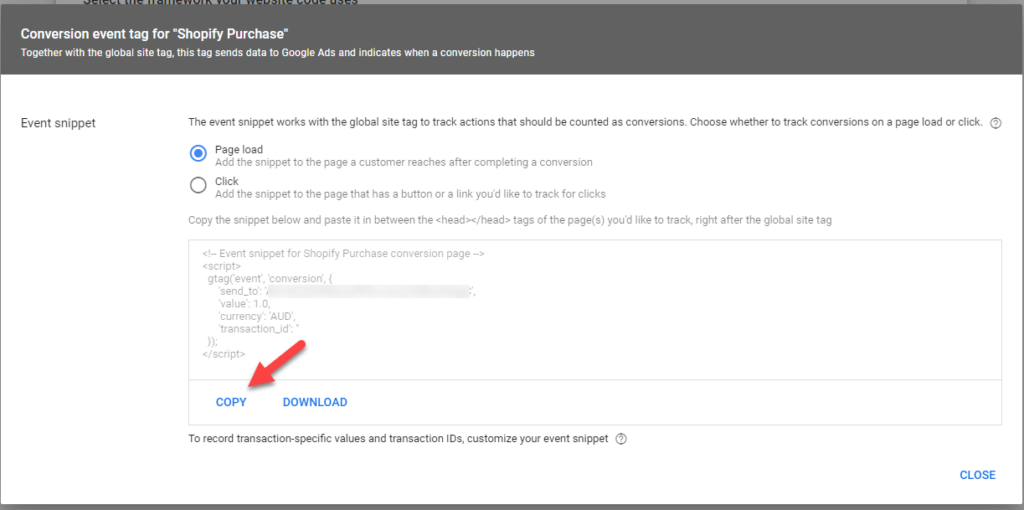
Click on See event snippet


Copy the code and paste in a temporary text file, we will copy some details at a later stage.

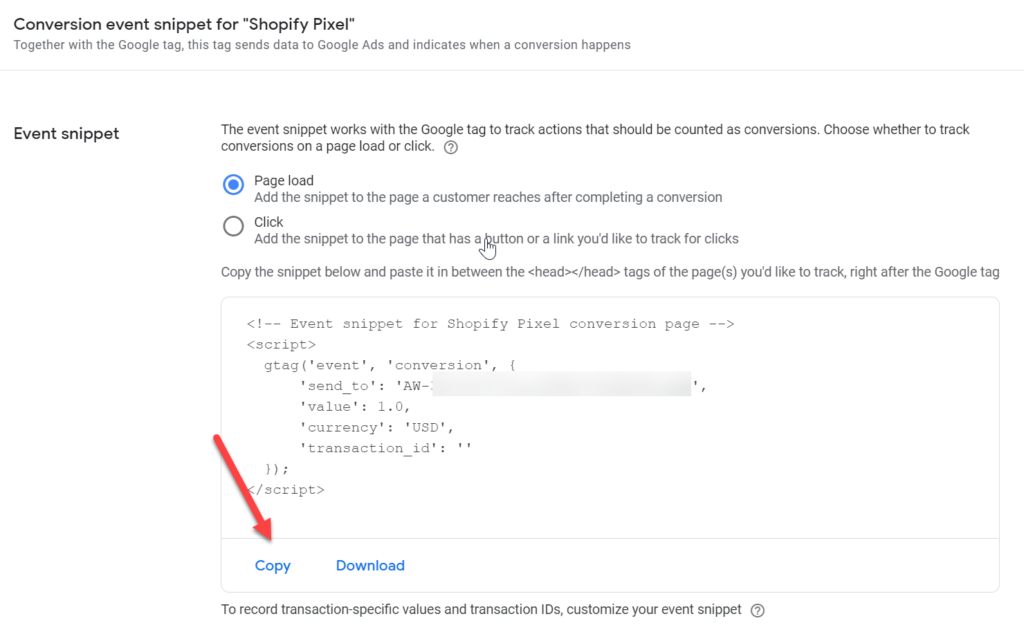
Click on Done.
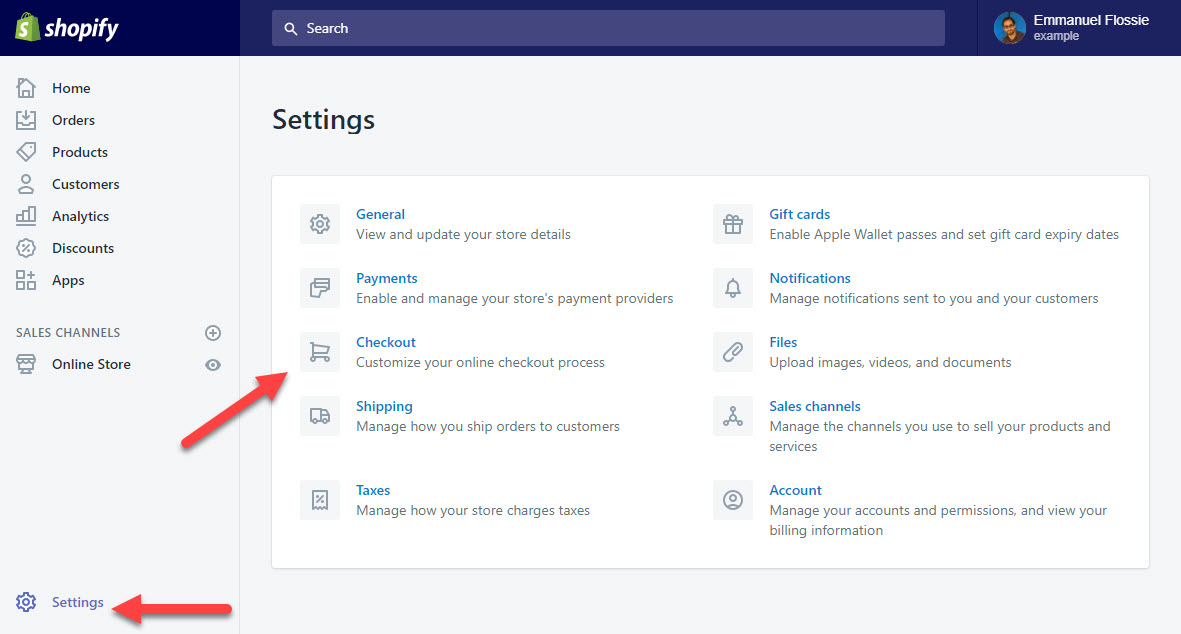
Now go to Shopify > Settings > Customer Events
And click on Add custom pixel

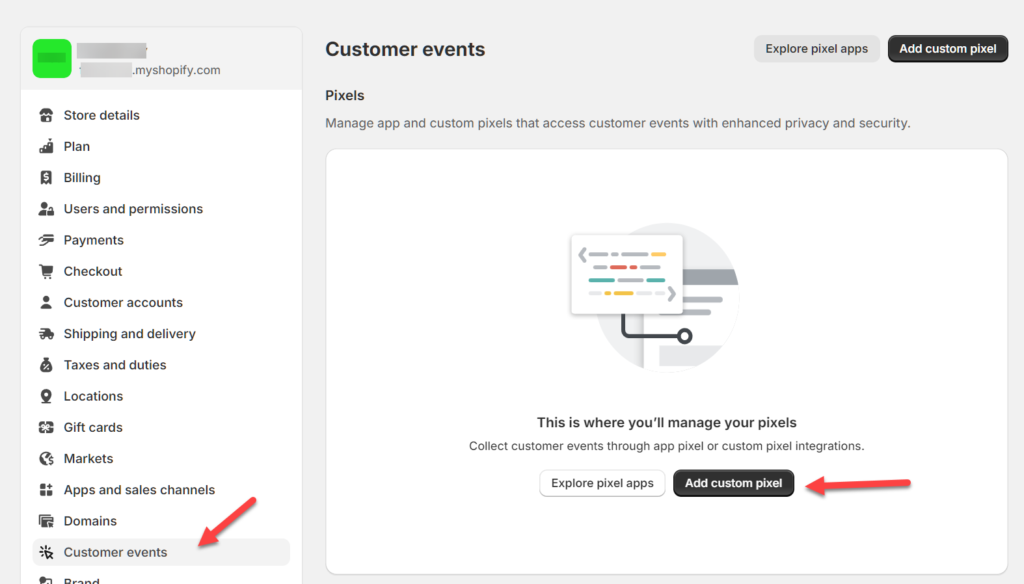
You can give it any pixel name, but I will call it Google Ads Conversion. Now click on Add pixel.

When editing the code below, please do not remove or change the author, and respect who built it.
// Created by FeedArmy V1.02
Paste the below code in the Shopify pixel.
// Created by FeedArmy V1.03
const script = document.createElement('script');
script.setAttribute('src', 'https://www.googletagmanager.com/gtag/js?id=AW-132456798');
script.setAttribute('async', '');
document.head.appendChild(script);

window.dataLayer = window.dataLayer || [];
function gtag(){dataLayer.push(arguments);}
gtag('js', new Date());
gtag('config', 'AW-1003648725', {'allow_enhanced_conversions':true});

analytics.subscribe("checkout_completed", (event) => {
  gtag('event', 'conversion', {
    send_to: 'AW-132456798/abcdefg123456789',
    transaction_id: event.data?.checkout?.order?.id,
    value: event.data?.checkout?.subtotalPrice?.amount,
    currency: event.data?.checkout?.subtotalPrice?.currencyCode,
    email: event.data?.checkout?.email,
    phone: event.data?.checkout?.phone,
    first_name: event.data?.checkout?.shippingAddress?.firstName,
    last_name: event.data?.checkout?.shippingAddress?.lastName,
    address1: event.data?.checkout?.shippingAddress?.address1,
    address2: event.data?.checkout?.shippingAddress?.address2,
    city: event.data?.checkout?.shippingAddress?.city,
    country: event.data?.checkout?.shippingAddress?.country,
    countryCode: event.data?.checkout?.shippingAddress?.countryCode,
    province: event.data?.checkout?.shippingAddress?.province,
    provinceCode: event.data?.checkout?.shippingAddress?.provinceCode,
    zip: event.data?.checkout?.shippingAddress?.zip
  });
});
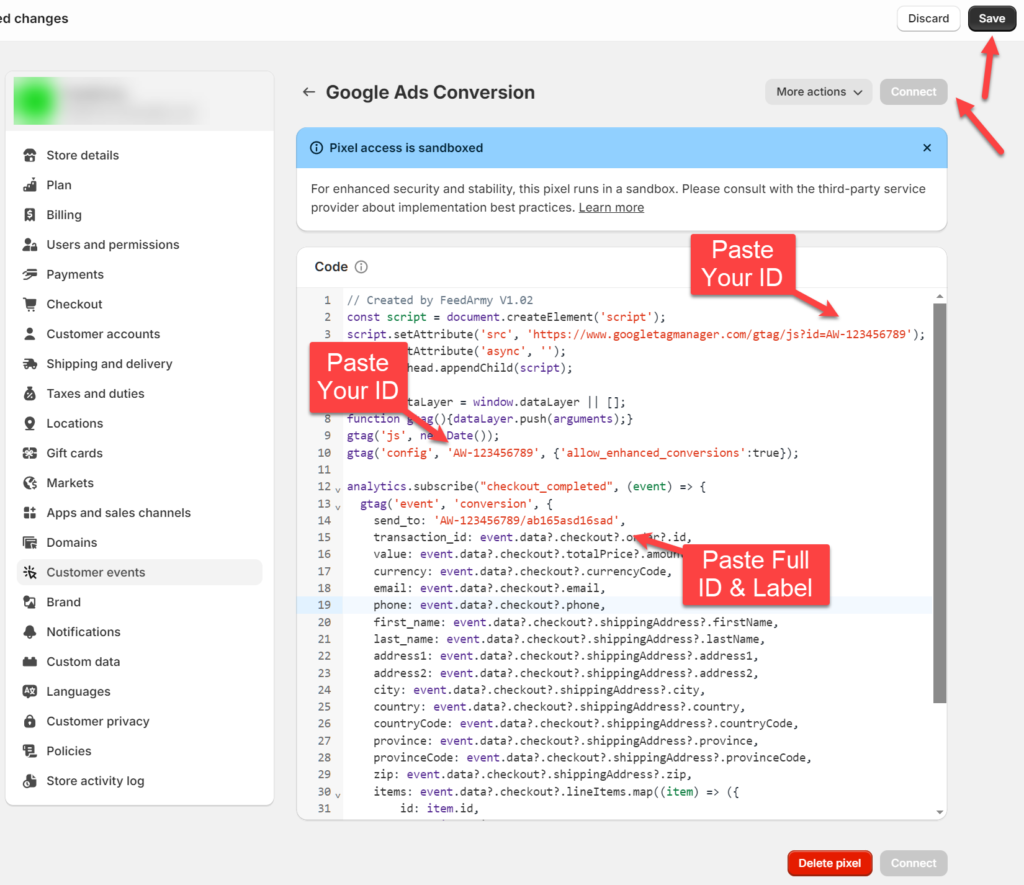
From your previously copied code from Google Ads, copy the AW-123456789 id highlighted in the image below.

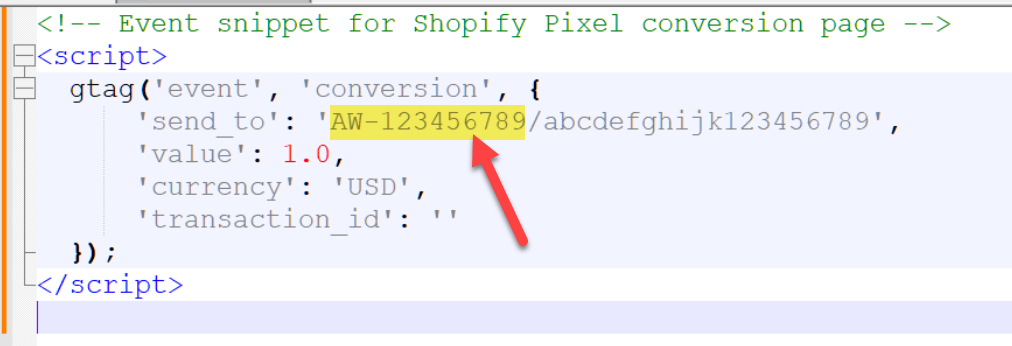
And paste it twice on row 3, and row 10, by replacing the existing ID AW-123456789 (shown in red in the image above)
Go back to your Google Ads code and now copy the full ID and Label as highlighted in the image below.
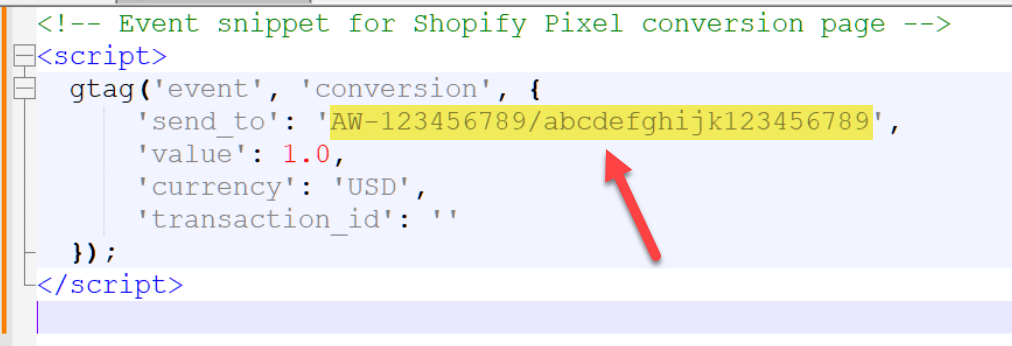
Replace the send_to value between the quotes on row 14. (shown in red in the above image)
Now click on save in the top right corner followed by clicking on Connect, accept Shopify terms and conditions. And you are all done.
Testing
You can’t test code on Shopify’s checkout thank you page because it’s in sandbox mode, meaning tools like Google Tag Assistant or GTM Preview Mode won’t work. While you could use console.log to check data, I think it’s unnecessary effort. The code does work. Simply wait for a sale to confirm that it’s tracked in Google Ads as a conversion when it comes from an ad click or wait until you have any sale, Google Ads will show the code is detected.
Change Log
- V1.03 02 March 2024 : Supports multicurrency and used subtotal price instead of total
- V1.02 27 February 2024 : Public Release
Support My Work!
My conversion tracking code is constantly updated and provided free for anyone to use. As I don’t ask for any monitary value in return, I would be grateful if you consider leaving a review: https://www.trustpilot.com/review/feedarmy.com
Additional Scripts

Supported Functions
- Automatically supports multi currencies.
- Automatically converts European prices with commas to dots.
- Optional choice for disabling tax and shipping in your checkout value.
- Includes the new Google Ads enhanced conversion option
Requirements
- Access to Google Ads > Conversions
- Access to Shopify > Settings
Step 1: Open Shopify Checkout Settings
Open a new tab in your browser and log in to your Shopify Admin Panel
Navigate to Settings (Gear Icon) and choose Checkout
Step 2: Setup & Copy Your Google Ads Conversion Code
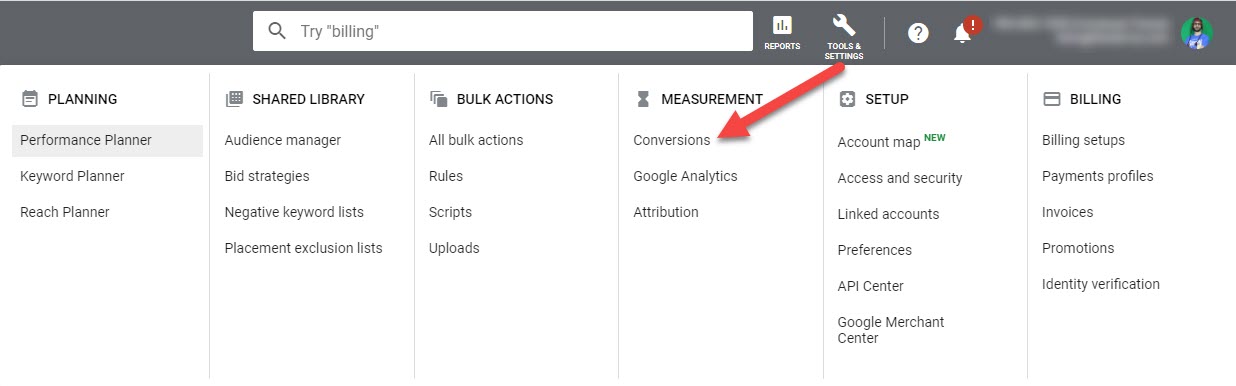
In a second browser tab, login to Google Ads and click on the tools and settings menu in the top right corner and select Conversions under the Measurement column.
Click on the big blue plus sign (New Conversion Action).
Now select website as your tracking template.
It will now ask you to scan your website URL. Enter your URL and click on scan.
Scroll to the bottom and choose to install the conversion action manually.
Then do the following :
- Conversion name
- enter any name
- Category
- Purchase / Sale
- Value
- Use different values for each conversion
- Attribution model
- Choose Position-Based (recommended for growth based businesses)
- The rest can be as default
I have written a great article on how to choose your attribution model.
Click on Create and continue
Now you can click on Save And Continue

Click on See Event Tag

Copy your Event Snippet and save it in a temporary file, for later use.

Click on Done

Click on the recently added conversion action

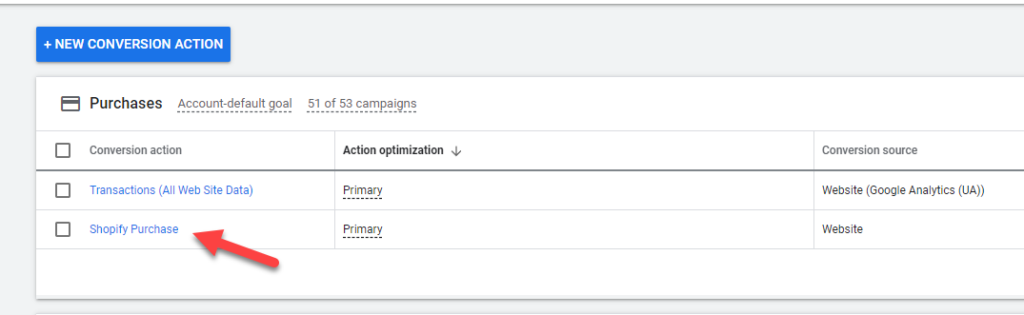
Enabling Enhanced Conversions is optional and not required. Some accounts may not see this option yet. So you can continue the steps below, excluding those related to enhanced conversions. (Skip to Step 3)
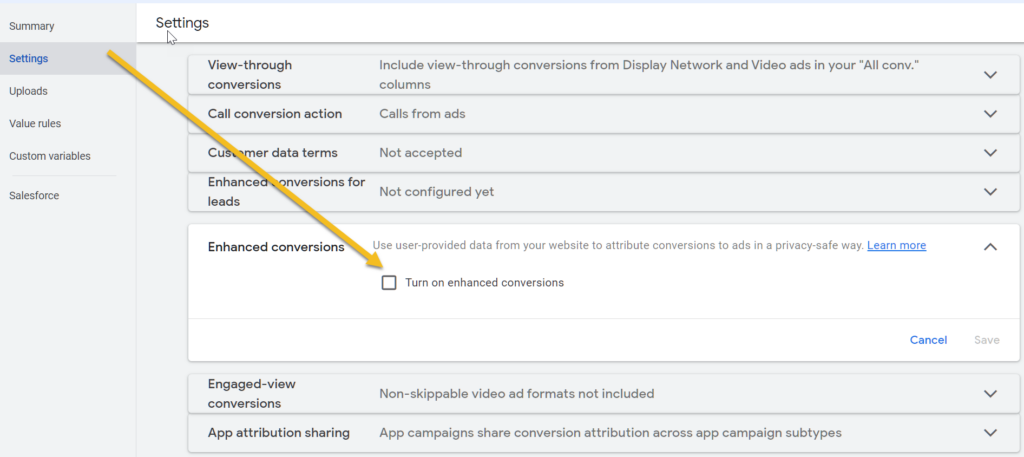
Now go to Tools and Settings > conversions > settings or click here: https://ads.google.com/aw/conversions/customersettings
By enabling enhanced conversions you allow Google to improve its accuracy to track conversions. This seems to be required due to Apple’s IOS14 no tracking prompt.
After you have checked the box and clicked on save, you will get a terms and conditions prompt, read it and confirm.

Now choose Google Tag and click on Tag Details.

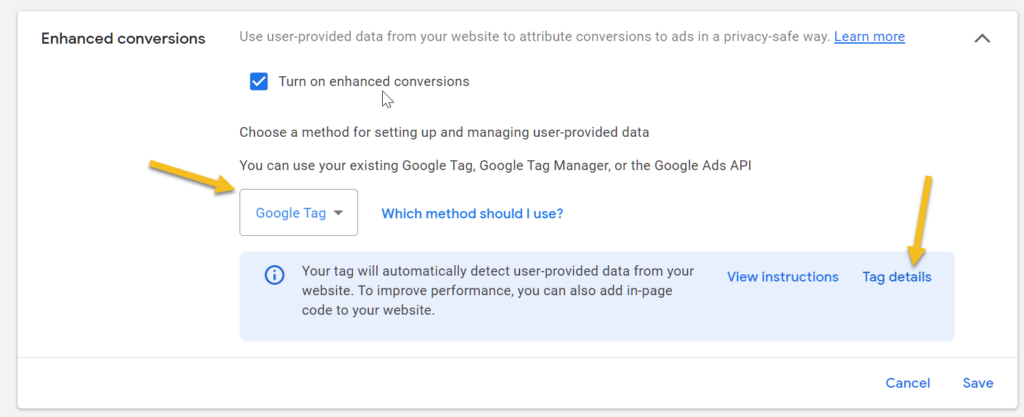
Now check the box next to Specify CSS selectors or JavaScript variables
- Change CSS selector to Global Javascript variable
- Enter the following values for Email
- enhanced_conversion_data.email
Repeat the steps for Phone number and Name and Address
- Phone
- enhanced_conversion_data.phone_number
- First name
- enhanced_conversion_data.first_name
- Last name
- enhanced_conversion_data.last_name
- Street address
- enhanced_conversion_data.home_address.street
- City
- enhanced_conversion_data.home_address.city
- State
- enhanced_conversion_data.home_address.region
- Country
- enhanced_conversion_data.home_address.country
- Postal code
- enhanced_conversion_data.home_address.postal_code

You might ask, why the javascript values? Well on your thank you page, the javascript selector for all the values is added as a javascript variable when using the conversion tracking code below (From V1.5). This will only work if you use the code below.
Step 3: Editing and Pasting Your Google Ads Conversion Tracking
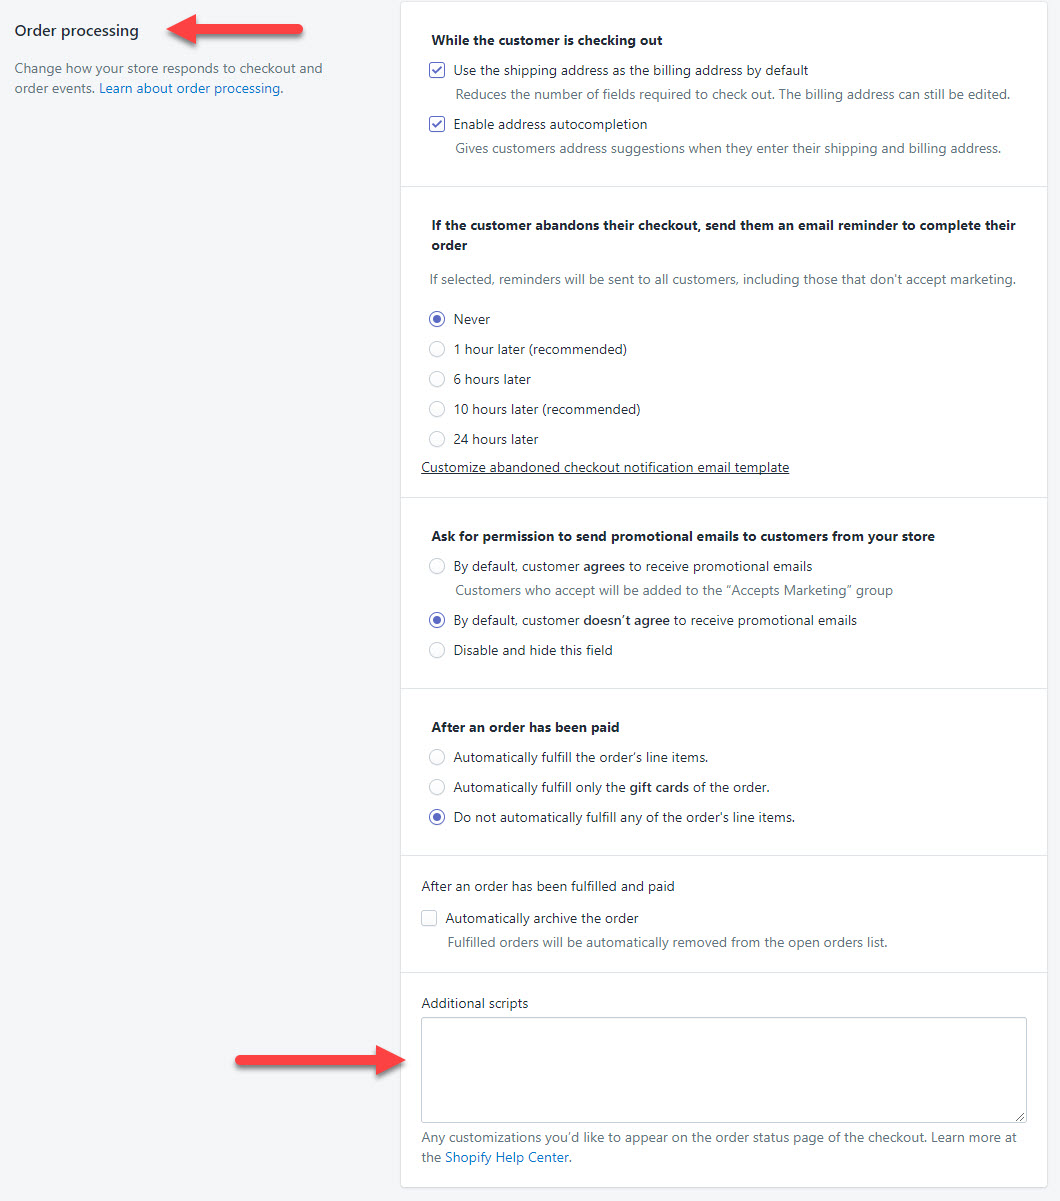
Go back to Shopify and scroll down until you see Order Processing (from step 1), at the bottom of this section you will have a field where you can paste code that is labeled Additional Scripts.
If you have two fields such as post purchase and order status, then add the code to the order status field.
Copy the send_to value (image below) and replace fa_send_to value with your value in the code template below.
- replace the value for fa_send_to
- replace the value AW-123456789/abcdefghijlklmnopq with your event snippet send_to value
- Choose yes or no for fa_include_tax_and_shipping
- choose yes if you want to include tax and shipping in the checkout value or no to not include tax and shipping values.
Sometimes on rare occasions, when you set fa_include_tax_and_shipping to no, it would still include the shipping. I’m not sure why this sometimes happens, but it might have to do with the account country. So if you notice shipping is included, set the value to yes, and it will remove shipping.
Code Template (change the fa_send_to value with your code snippet send_to value)
<!-- FEEDARMY START Global site tag (gtag.js) - Google Ads V2.2 -->
<!-- For the latest and updated code or tutorial: https://feedarmy.com/kb/adding-adwords-conversion-tracking-to-shopify/ -->
{% assign fa_send_to = 'AW-123456789/abcdefghijlklmnopq' %}

{% comment %}DO NOT EDIT BELOW{% endcomment %}
{% if fa_google_coding %}{% assign fa_google_coding = true %}{%- else -%}{% assign fa_google_coding = false %}{%- endif -%}
{% assign fa_google_ids = fa_send_to | split: "/"  %}

{% if fa_google_coding == false %}
<script async src="https://www.googletagmanager.com/gtag/js?id={{fa_google_ids[0]}}"></script>
{%- endif -%}
<script>
  window.dataLayer = window.dataLayer || [];
  function gtag(){dataLayer.push(arguments);}
  gtag('js', new Date());
  gtag('config', '{{fa_google_ids[0]}}', {'allow_enhanced_conversions':true});
  var checkout = window.Shopify.checkout;
</script>
{% if first_time_accessed %}
<script>
  gtag('event', 'conversion', {
      'send_to': '{{ fa_send_to }}',
      'value': checkout.total_price_set.presentment_money.amount,
      'currency': checkout.total_price_set.presentment_money.currency_code,
      'transaction_id': '{{ order_id }}',
  });
  var enhanced_conversion_data = {
    {% unless billing_address.first_name == blank %}"first_name": "{{ billing_address.first_name }}",{% endunless %}
    {% unless billing_address.last_name == blank %}"last_name": "{{ billing_address.last_name }}",{% endunless %}
    {% unless checkout.email == blank %}"email": "{{ checkout.email }}",{% endunless %}
    {% unless billing_address.phone == blank %}"phone_number": "{{ billing_address.phone }}",{% endunless %}
    "home_address": {
      {% unless billing_address.street == blank %}"street": "{{ billing_address.street }}",{% endunless %}
      {% unless billing_address.city == blank %}"city": "{{ billing_address.city }}",{% endunless %}
      {% unless billing_address.province_code == blank %}"region": "{{ billing_address.province_code }}",{% endunless %}
      {% unless billing_address.zip == blank %}"postal_code": "{{ billing_address.zip }}",{% endunless %}
      {% unless billing_address.country_code == blank %}"country": "{{ billing_address.country_code }}"{% endunless %}
    }
  };
</script>
{% endif %}
<!-- FEEDARMY END Global site tag (gtag.js) - Google Ads V2.2 -->
Verifying and Testing
Verifying
You can verify if the code is working if you go to Google Ads > Tools and Settings > Conversions > here check if the status is verified.
Testing
First open up Tag Assistant when the new window opens up make a test payment to check if the conversion tracking is correctly installed. When you are on the final thank you page check the data within Tag Assistant.
Tip:
first_time_accessedis for the page, not for the customer. Subsequent orders will run afirst_time_accessagain for the same person if it is a new browser session.
Trouble Shooting Enhanced Conversions
Make sure you have waited at least 3 to 7 days. Google requires time to compile the data.
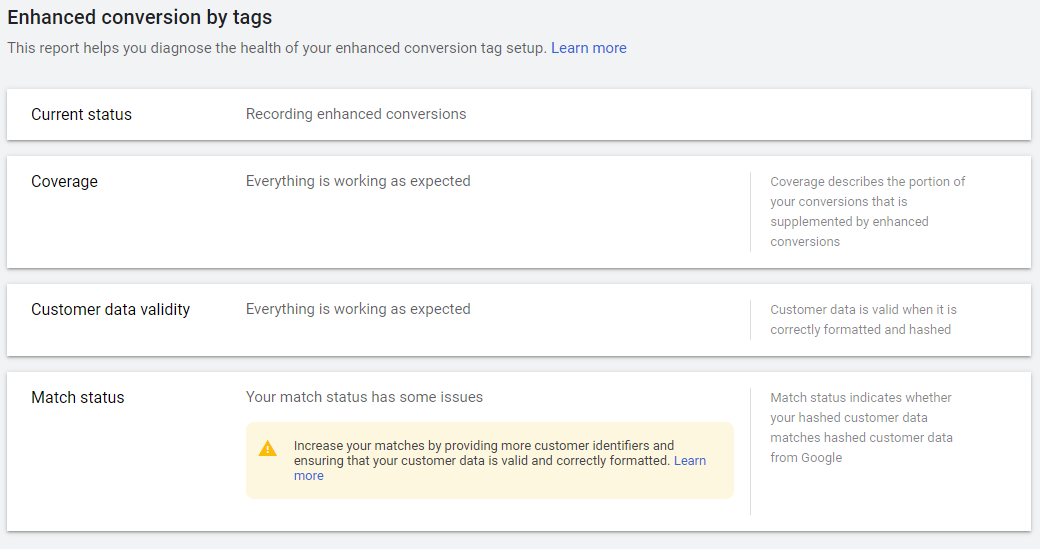
Coverage:
You may encounter issues with regard to coverage. This can happen when customers pay through a third-party payment processor (PayPal), which may require that they enter customer data on a different domain instead of directly on your website like they do when they do not use a third-party payment processor.
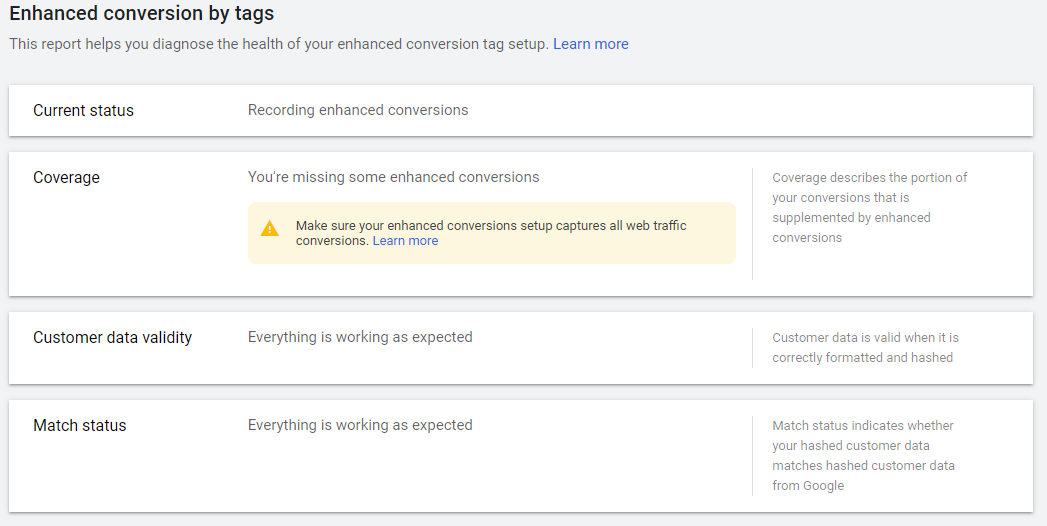
Match status:
If you are having issues with the match status, not all users fill out all the fields in your checkout. What you could do is remove the attributes in your Google Ads conversion list to only track emails or only track mandatory fields in your checkout.
By removing non-mandatory fields, you will avoid submitting empty fields to Google.
Change Log
- 8th September 2023 – updated the steps for enhanced conversion tracking
- V2.2 – 11 July 2023 – updated code to validate every value
- V2.1 – 24 June 2023 – updated checkout price to use presentment_money
- V1.8 – 10 August 2022 – Added enhanced conversion checks for email and phone number
- V1.7 – 07 June 2022 – Fixed incorrect total value when changing shipping and tax settings
- V1.6 – 28 April 2022 – Fixed the country code not adding the value correctly as highlighted by Jon Yildiz
- V1.5 – 27 July 2021 – Added Enhanced Conversions using Javascript and removed CSS
- V1.4 – 21 July 2021 – Added Enhanced Conversions using CSS
- Due to server migration, older changes are not listed
Support My Work!
My conversion tracking code is constantly updated and provided free for anyone to use. As I don’t ask for anything in return, I would be grateful if you consider leaving a review: https://www.trustpilot.com/review/feedarmy.com
Enable Remarketing
Track your existing website visitors by installing remarketing for Shopify. A returning visitor is twice as likely to convert as a first-time visitor. Use this data for display remarketing ads and audience targeting.
Enable Micro Conversions
If you like to track more minor conversion actions ie, micro-conversions such as add to cart, view cart, add a delivery address. Then install Google Analytics Goals.